
Car Washing Guide - Featuring BLACKFIRE Car Care P
Car Washing Guide: Featuring BLACKFIRE Car Care Products
By: Robert S. @ BLACKFIRE | 10-23-2019
In this installment, we will be going over how to wash your car in the most effective manner. Because we are working on a car that has never been professionally detailed before, our method may be a lot more extensive than the method you use. However, we believe that this overview will help you make a breakthrough in your current washing routine and help you achieve better results, even if you don't use our exact method! The first and one of the most important steps in a detailing ritual is the weekly (ideally) car wash. As car paint and the detailing industry has evolved, so has the car washing routine. Gone are the days of lathering your automotive pride and joy up with whatever dish soap you have lying around the kitchen and rubbing it down with a dirty old sponge that has been fermenting in your garage for years. If you want to achieve the best results, your approach to your car wash must be more nuanced and tactical than that! To that end, we are going to be breaking down our multi-step, all-inclusive car washing method that is guaranteed to leave your vehicle spotless! Step 1: The Pre-Rinse As you are driving your car down the road (or even if it's just sitting in your drive-way), there is an endless number of contaminants to which it is being exposed. Contaminants such as road grime, tar, bird droppings, insect remains, mud, dirt, oil, iron particles, pollen, etc. The list is nearly endless! And these contaminants aren't the type to commit a hit-and-run, they are going to stay and latch onto your paint. They will slowly but surely eat away at your car's precious clear-coat and leave permanent damage that is nearly irreparable! What's worse is that if you just wash your car while it is ridden with all of these contaminants, you risk rubbing them across the surface, causing marring and scratching in the process. It is for this reason that a pre-rinse is extremely important! The goal of the pre-rinse is to rid your car of as many of these contaminants as possible before ever touching a sponge or mitt to the surface. Keep in mind, a pre-rinse will not be able to get 100% of the contamination off your car, but it will do a great job of removing the loose debris that collects on all the surfaces!
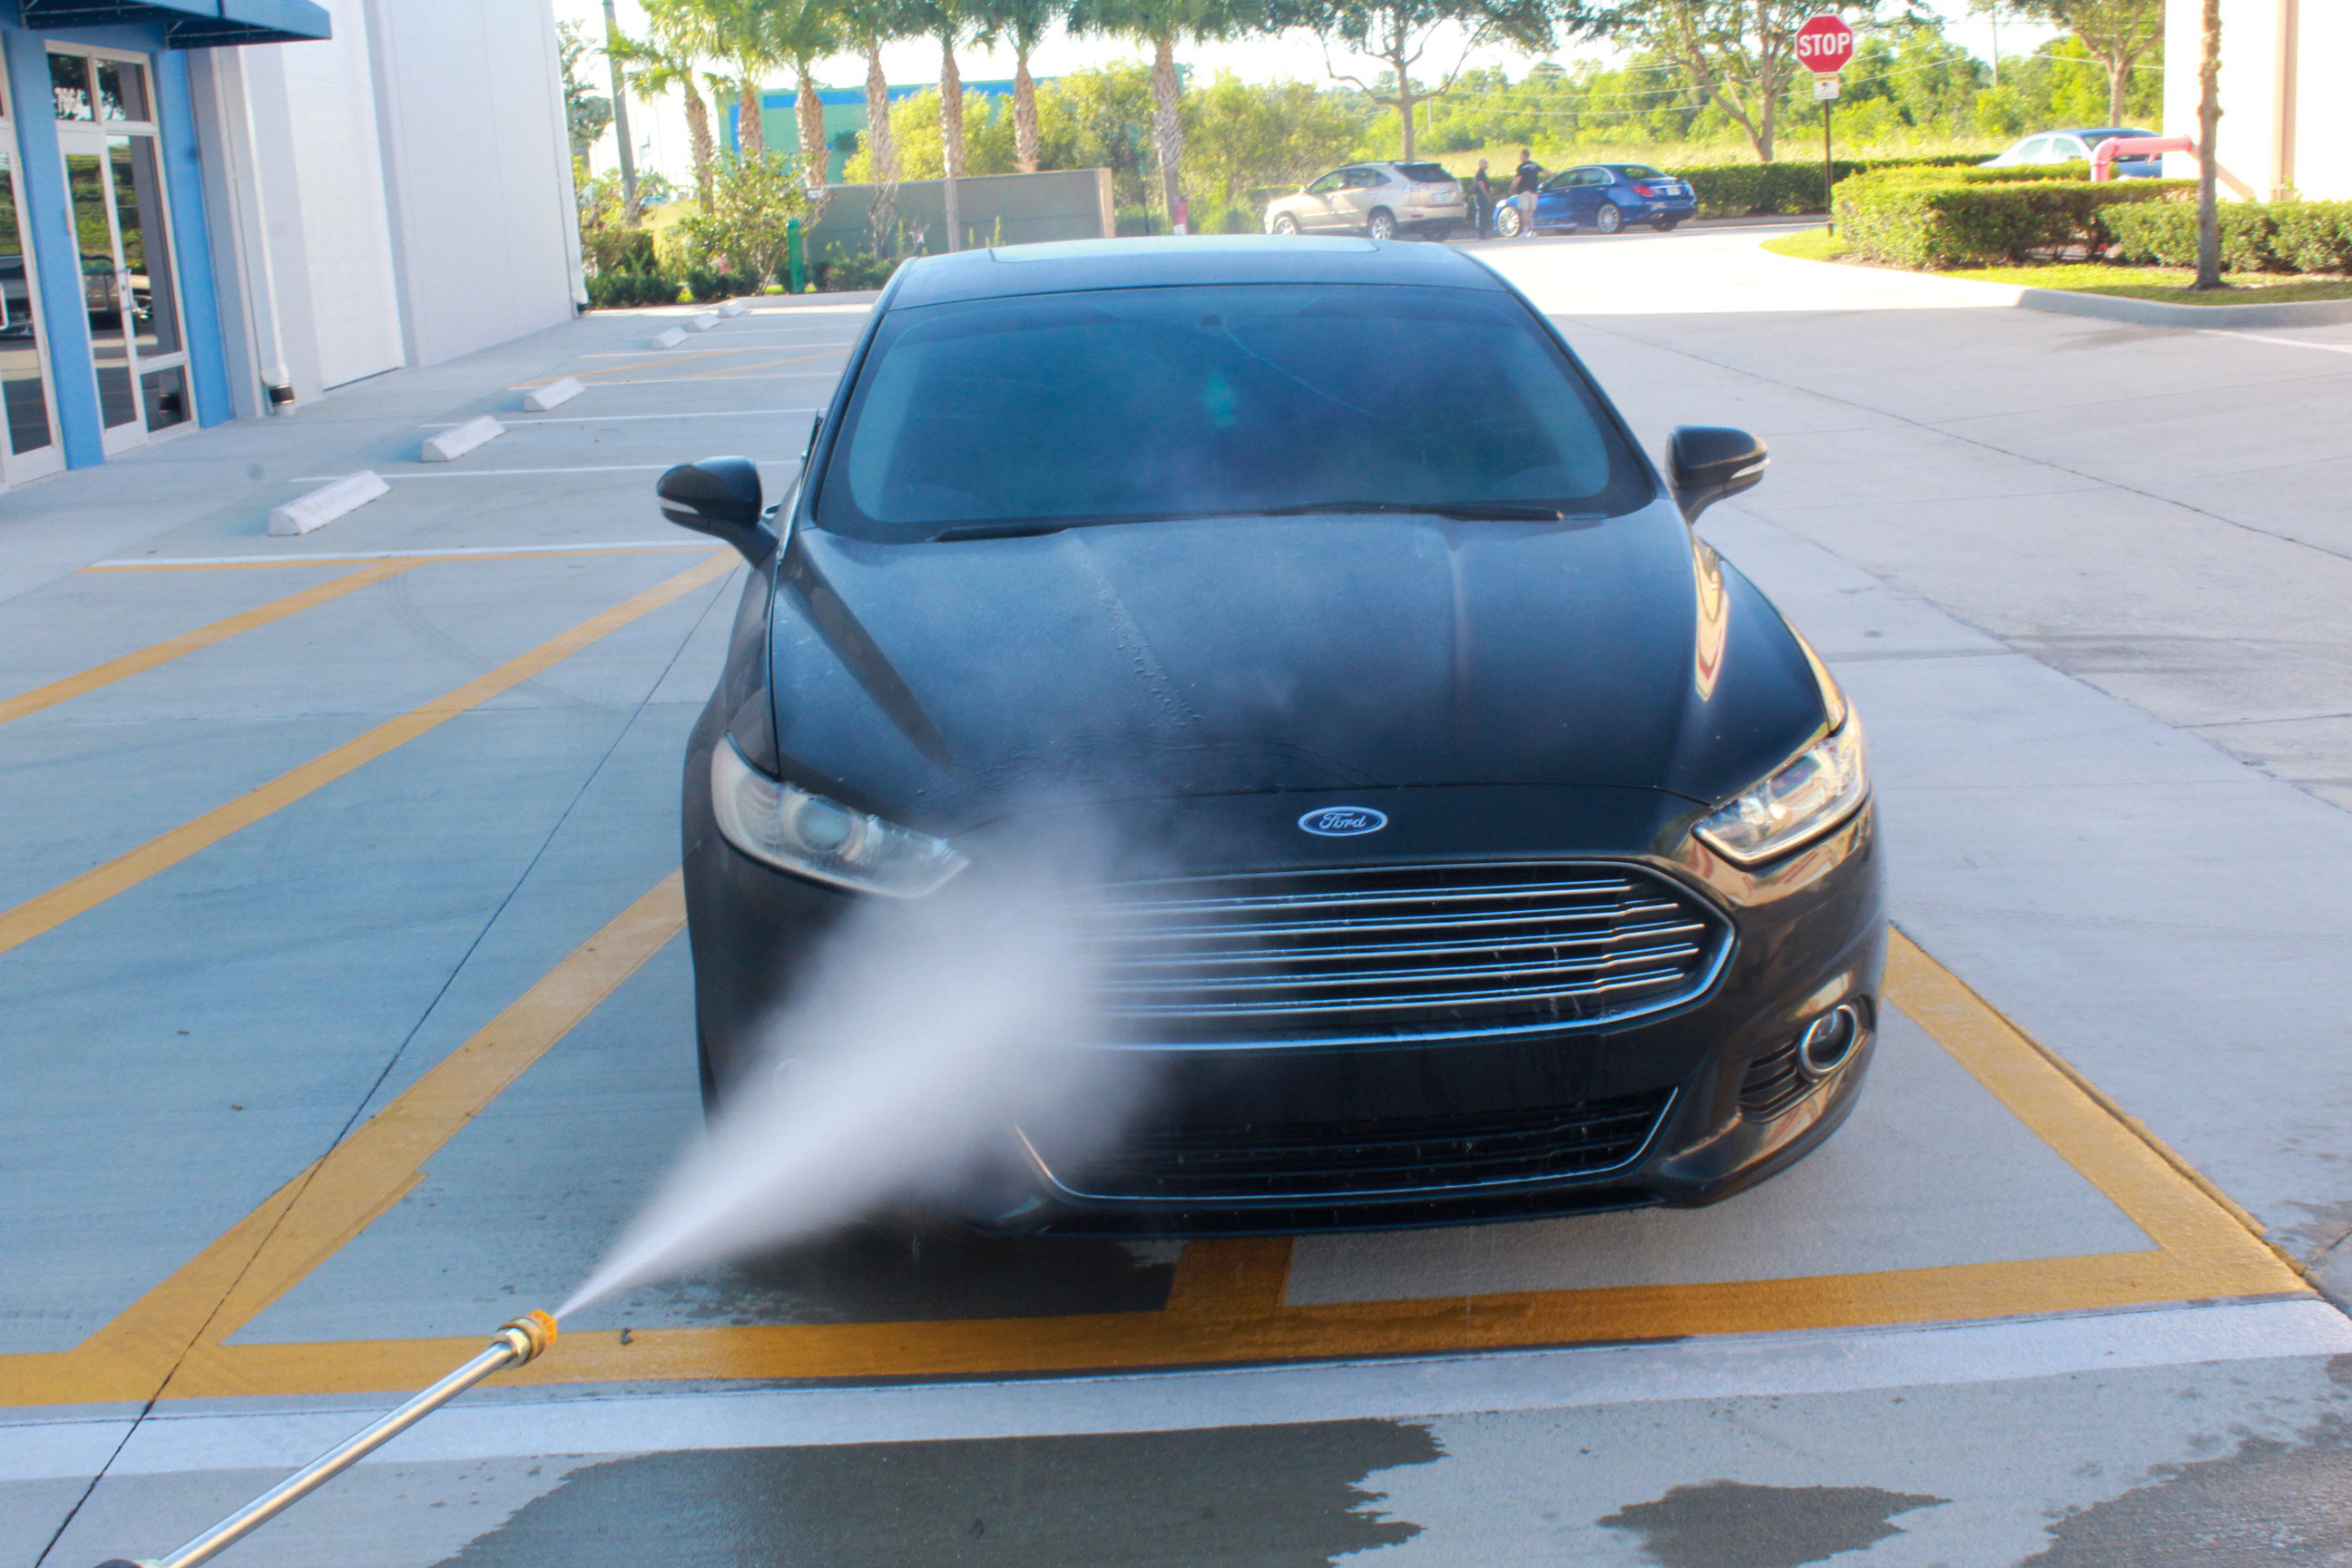
Because we want to make sure that we are removing as much loose debris as possible, we are going to be using a pressure washer to perform our pre-rinse. Don't worry, you won't have to worry about damaging your car by using a pressure washer. Car's are more than tough enough to stand up to the power of a pressure washer, but that loose debris is not! If you do not have access to a pressure washer or are still feeling a bit weary about the idea of trying it, you can perform a pre-rinse with a simple water hose. It is important to remember though, a water hose will NOT be able to remove as much debris as a pressure washer can, thus you will have to be more careful when you do eventually get to the washing step. It is also a good idea to use a hose instead of a pressure washer if you already have a layer of wax or sealant on your paint and you do not intend on reapplying after the wash. The pressure washer could strip away some or all of your currently existing protection product. Whenever you are using a pressure washer, you want to be extremely careful about which pressure washer you use and how you use it. Pressure washers are powerful tools and if they are not used correctly, they can cause some serious damage. The most important factor to take into consideration is the power of the pressure washer you are using. As a general rule, gas powered pressure washers are much more powerful and more intended to for the surface of your driveway, not your car. It is for this reason that we are using an electric pressure washer. Another consideration when determining which pressure washer to use is the GPM (Gallons Per Minute) of the pressure washer. For the purposes of car washing, you will want a pressure washer that has a GPM of anywhere from 1.4 to 1.6. This will give you enough water to actually clean the surface effectively. You also need to make sure that the PSI (Pounds per Square Inch) is adjusted to a level that is powerful enough to get the job done, but not powerful enough to peel the paint. Paint hardness varies from car to car, but usually you'll want to stay between 1200 and 1900 PSI. Most electric pressure washers allow you to adjust the PSI easily, so just make sure it is set to the right level before you begin. The last equipment specification you want to take into consideration is the spray nozzle you'll be using. The nozzle changes the spray pattern of the pressure washer to either be narrower or wider. The jet of water will get more concentrated and thus harsher as the jet gets narrower. The ideal nozzle to use when doing a pressure washer pre-rinse is usually a 25-degree nozzle. This will give you enough pressure to blast away the loose debris but not so much that you'll be cleaning your car's paint off your driveway a couple minutes later. Now that you know all the equipment considerations, it is time to go over the actual pre-rinse technique! We know this probably goes without saying, but we will say it anyway. DO NOT POINT THE PRESSURE WASHER AT YOURSELF OR ANYONE ELSE! These things pack a serious punch and are extremely dangerous should they be used on any person! Also, DON'T FORGET TO ROLL UP YOUR WINDOWS AND TIGHTLY SHUT ALL THE DOORS AND THE TRUNK! You don't want to drown your precious interior! As a general practice, you should always test the pressure of your pressure washer on the ground before actually using it on your car. Think of this as a fail-safe to make sure that you have set the pressure correctly prior to using it on your car. If it kicks too much, re-check the PSI setting on your pressure washer. Now, as we have not ever worked on this car before, we will want to approach the pre-rinse with plenty of caution. Because we don't know how this car will react, we are going to start from a bit further back to make sure the jet isn't as strong right off the bat. We are starting about 4-5 feet away from the car and slowly moving forward to reduce the risk of damage as much as possible. Usually, we will not ever get closer than about 1 foot away from the car. The first thing we are going to rinse are the tires and wheels. These tend to be the dirtiest part of the car and will kick up the most debris, so if we did them last, you would have to redo the whole paint surface again. Another good reason to tackle the wheels first is because they take longer. If we do the wheels last, the water on the rest of the car would dry and potentially cause water spots before we finished on the wheels.
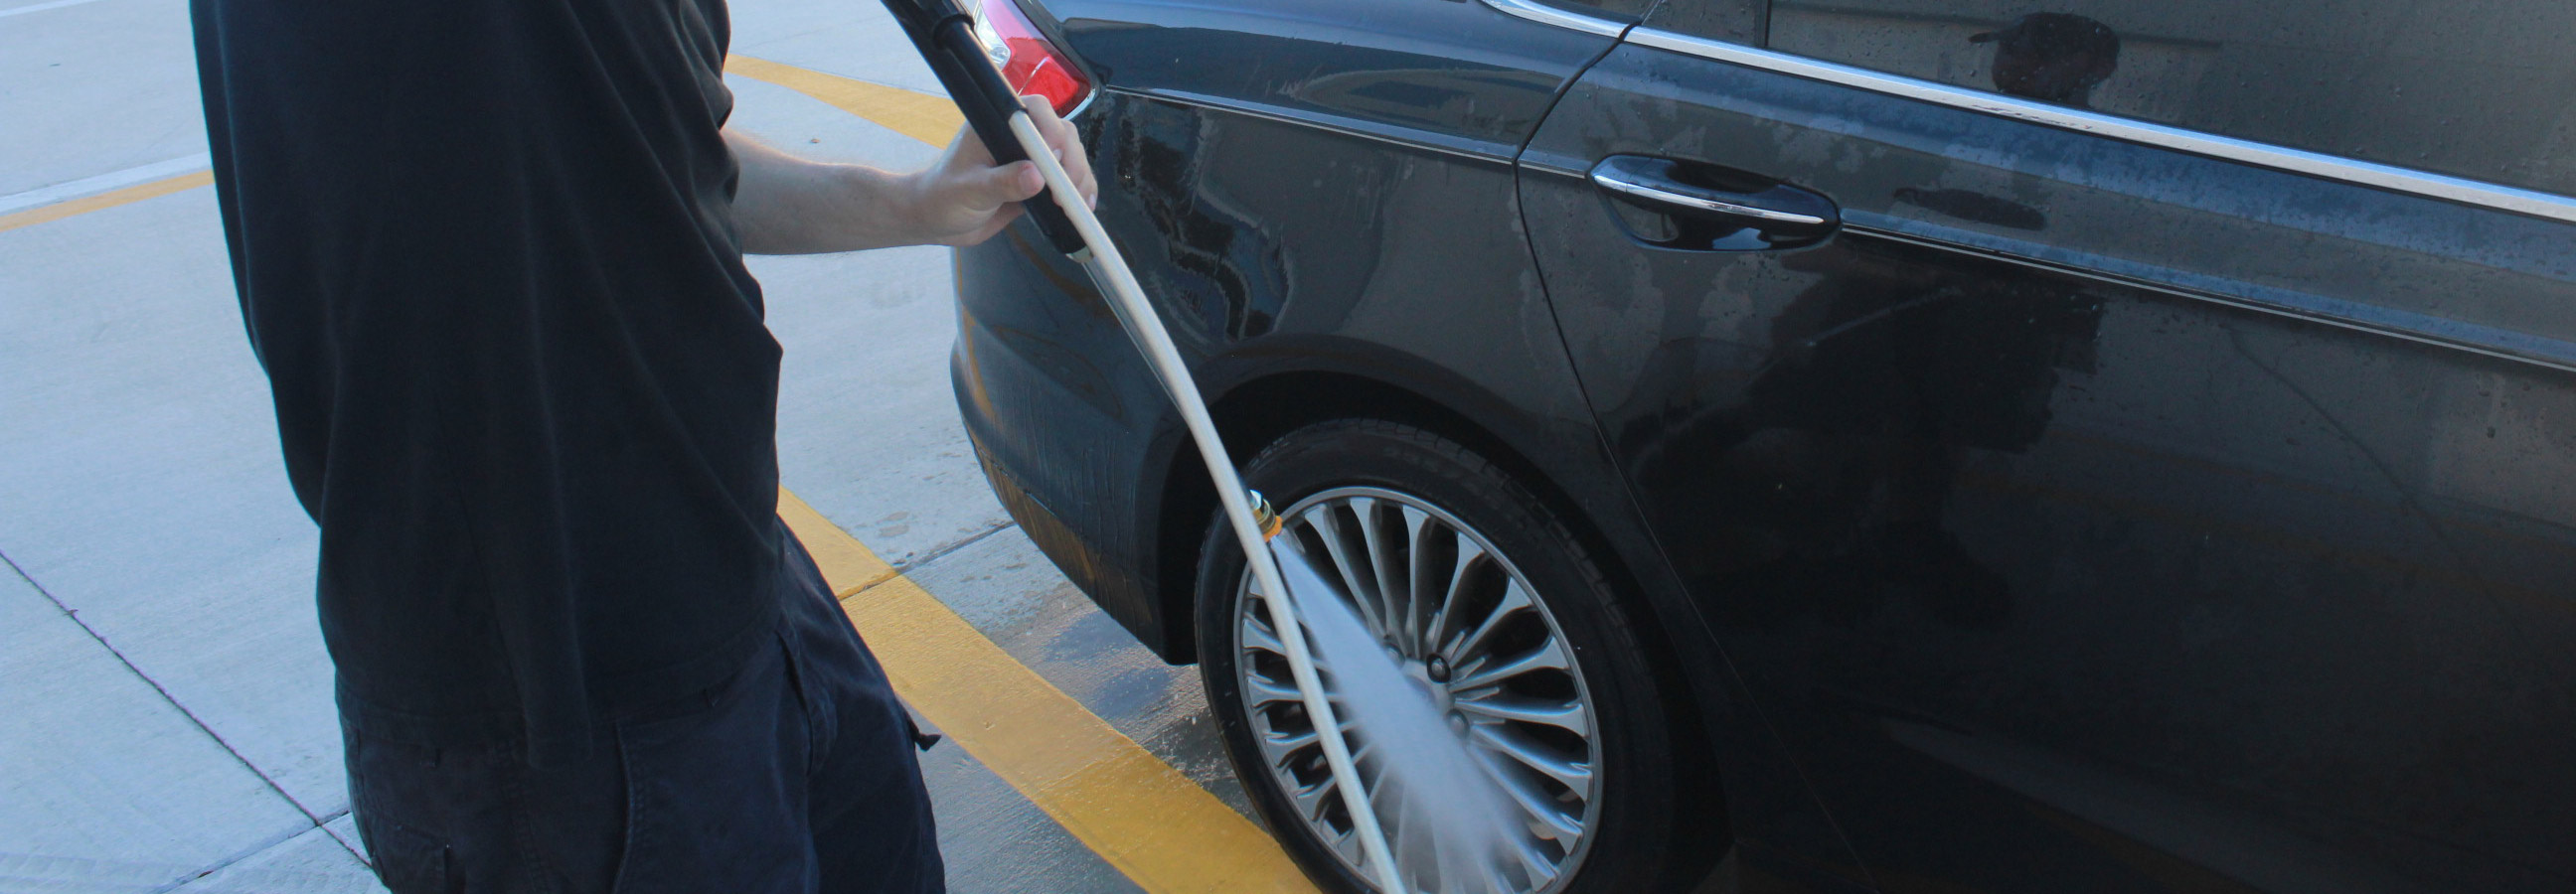
When working on the wheels, we will be getting a bit closer to them than we will the paint. This is because wheels are much dirtier and thus will require more power to rinse off. Then we are going to start at the top of the car and slowly work our way down. This will ensure that as we remove debris, we are not re-contaminating an already cleaned lower panel. We are also being sure to point the jet of water downward as we work. By doing so, we are pushing the debris in the direction we want it to go, down. Otherwise, we are risking the contaminants being launched onto another panel that we have already cleaned.
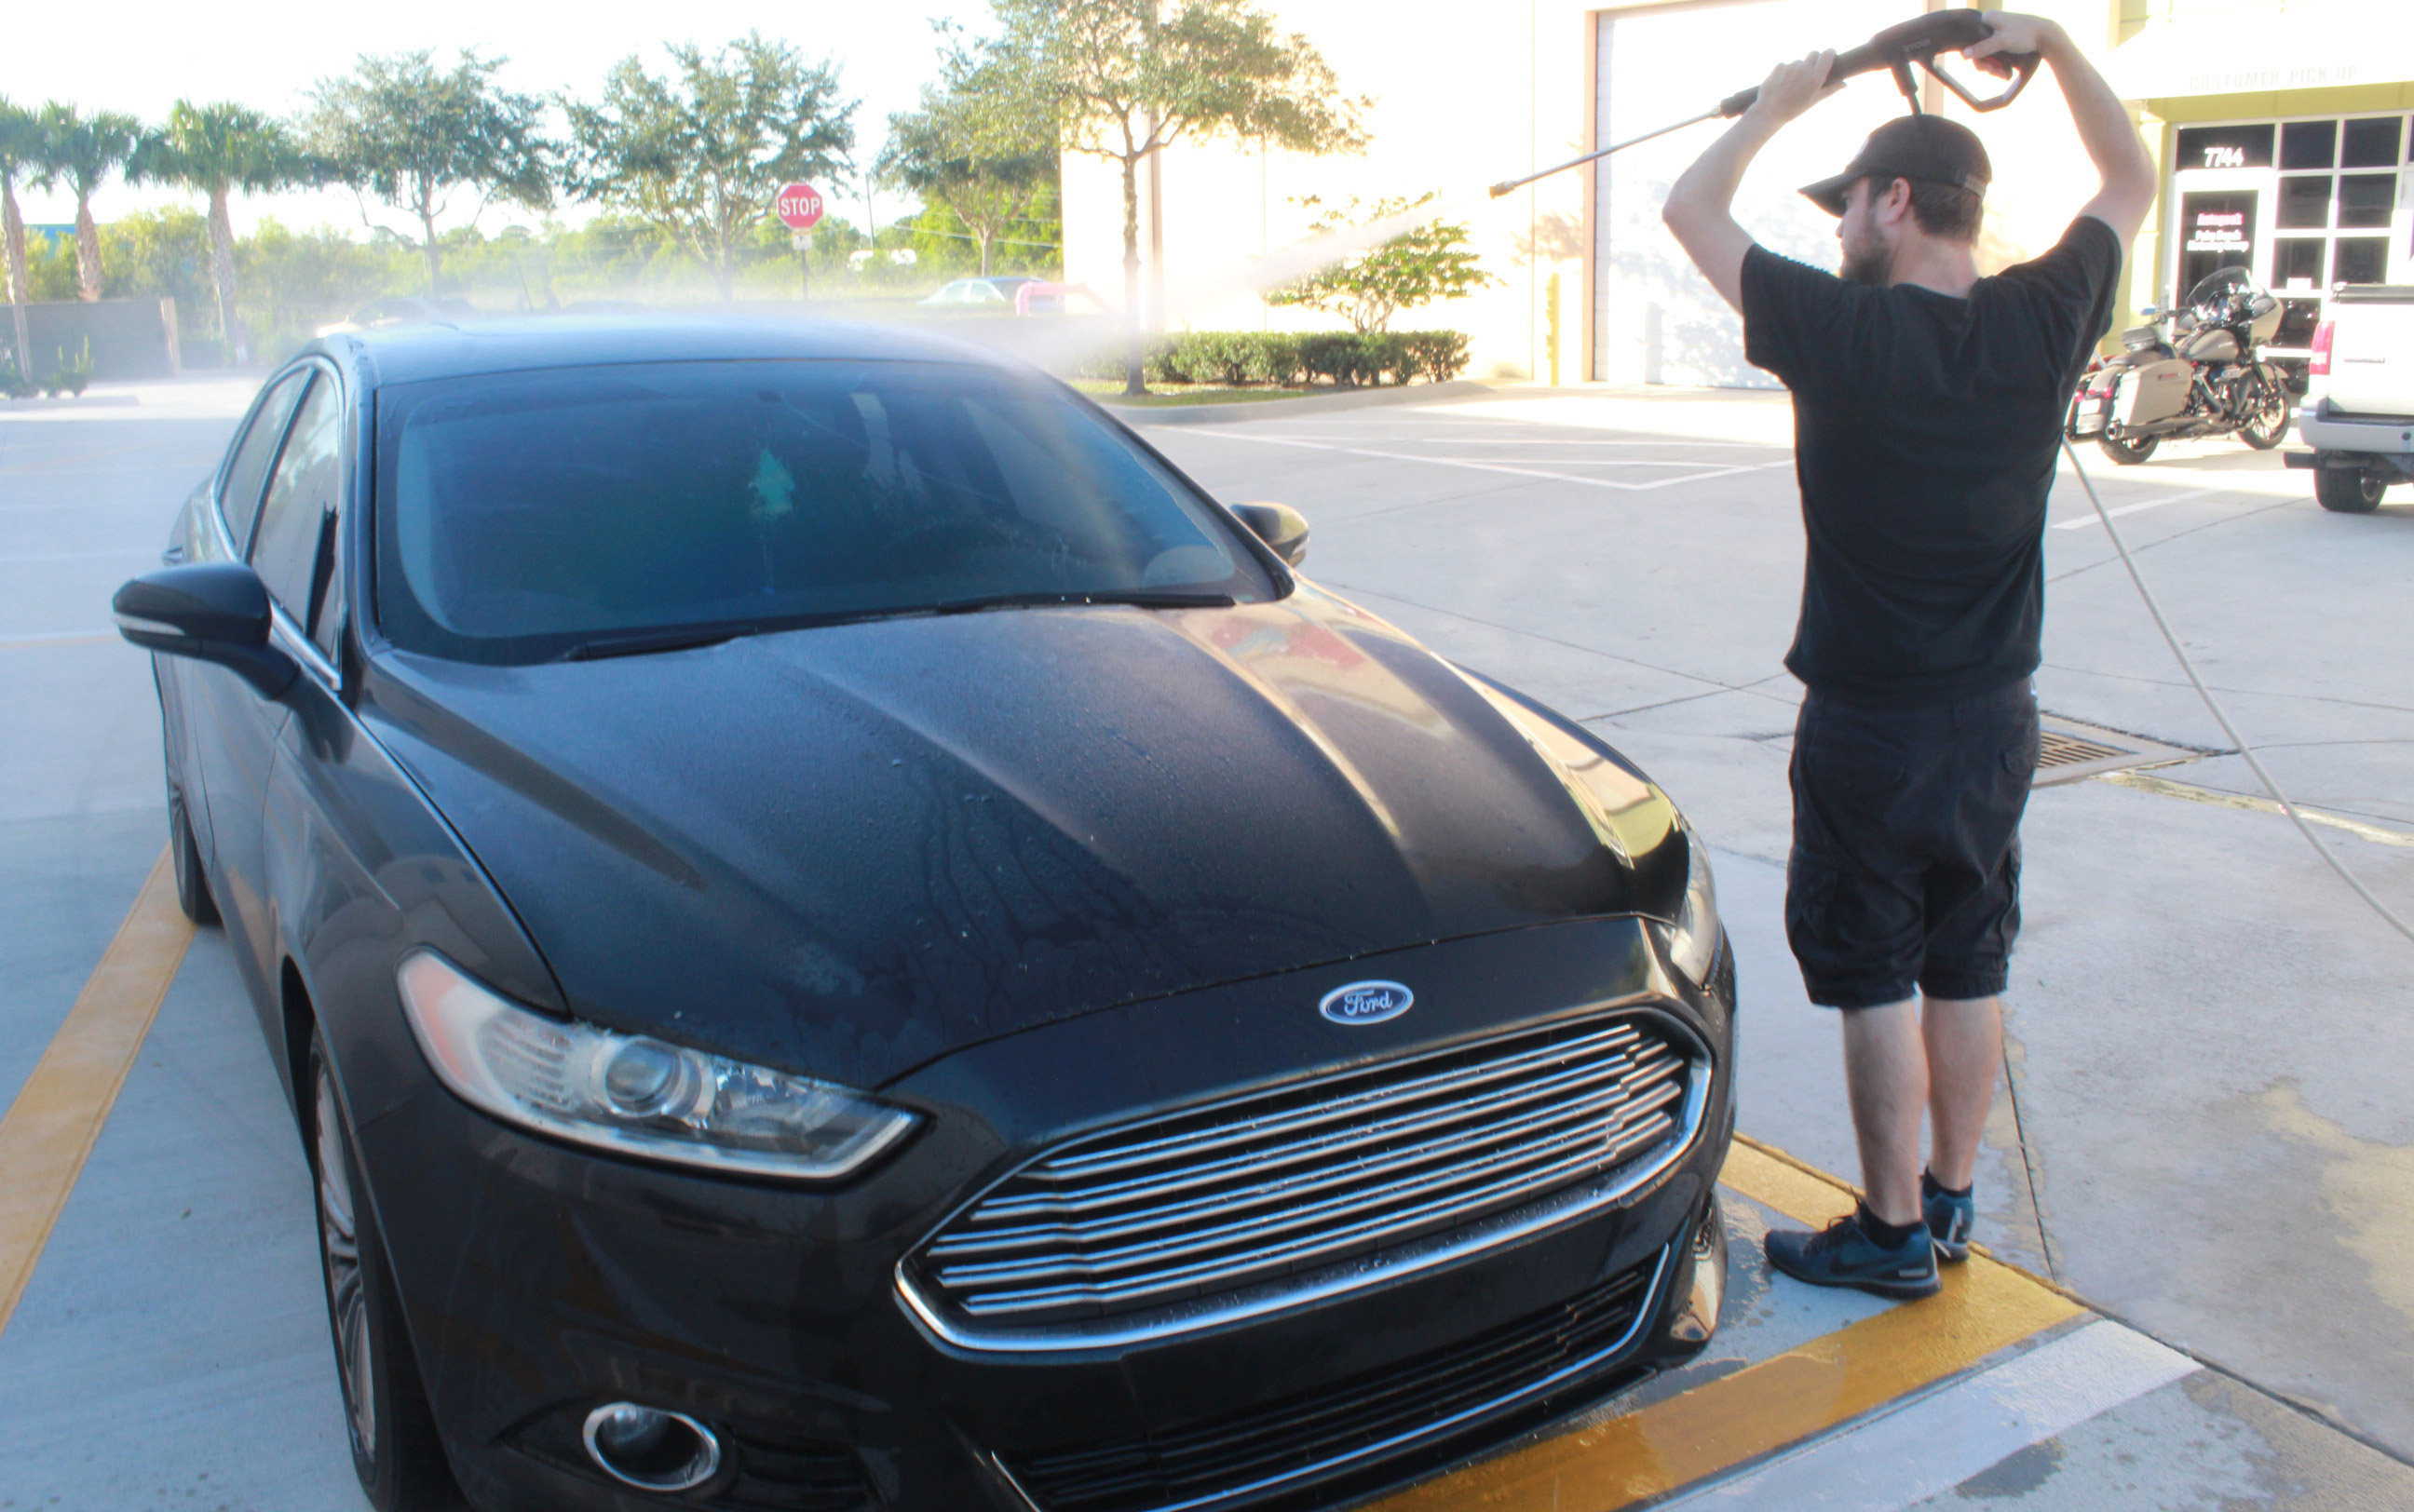
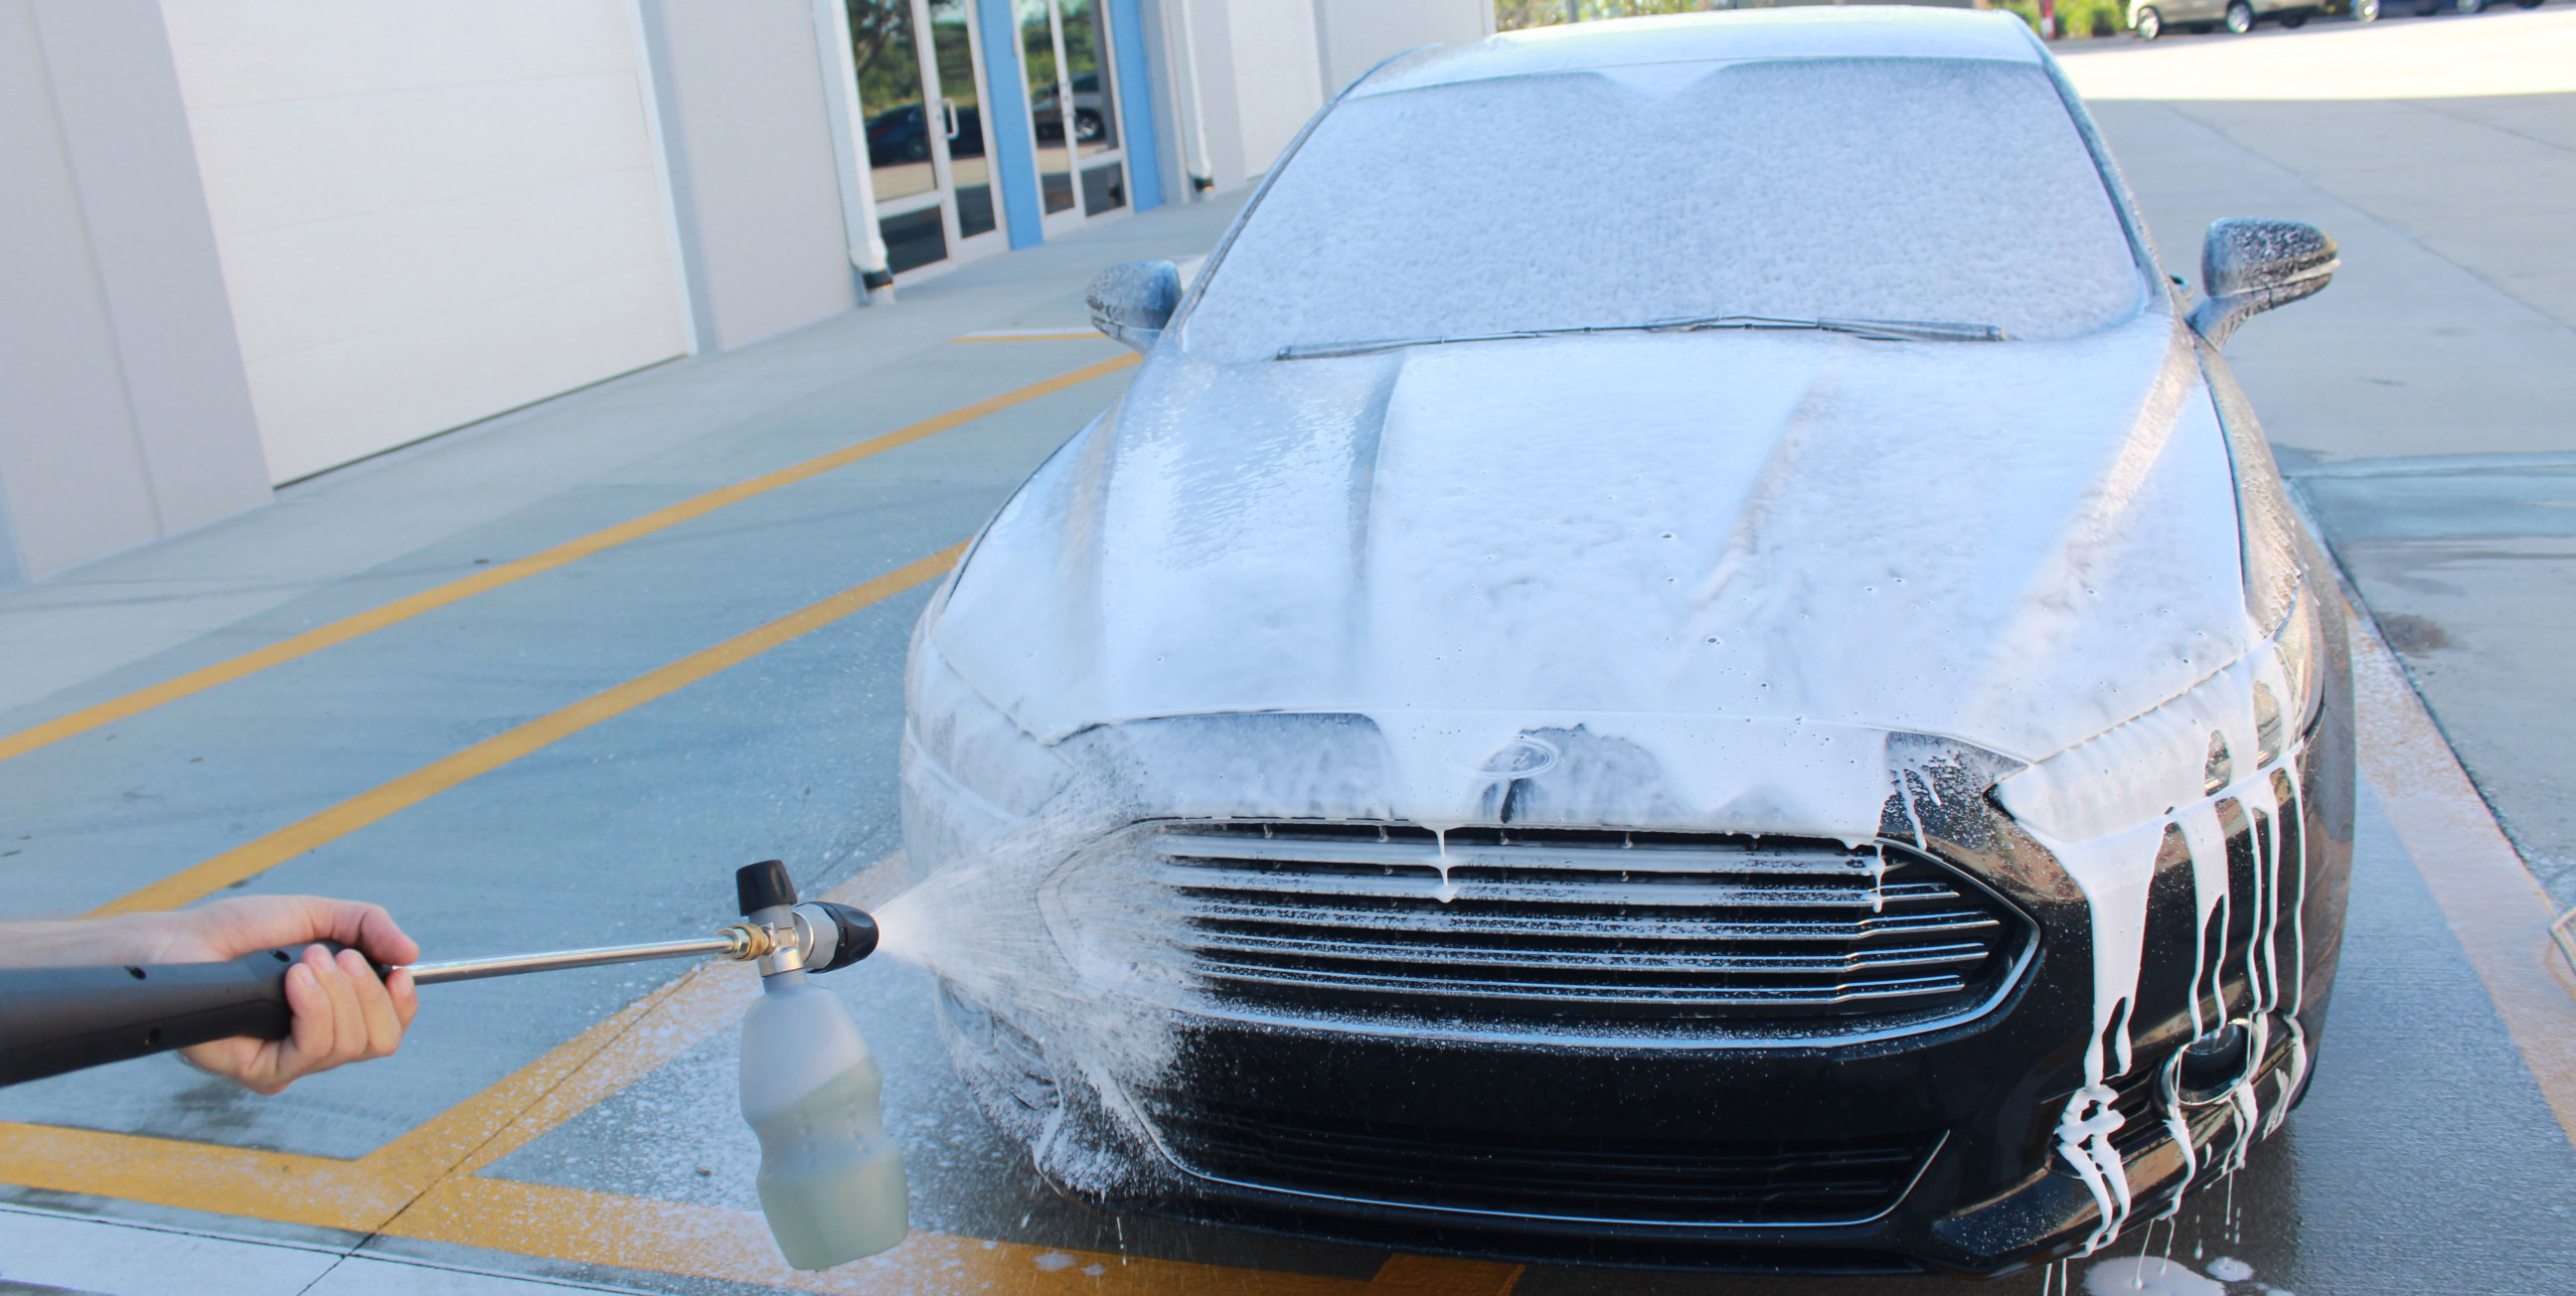
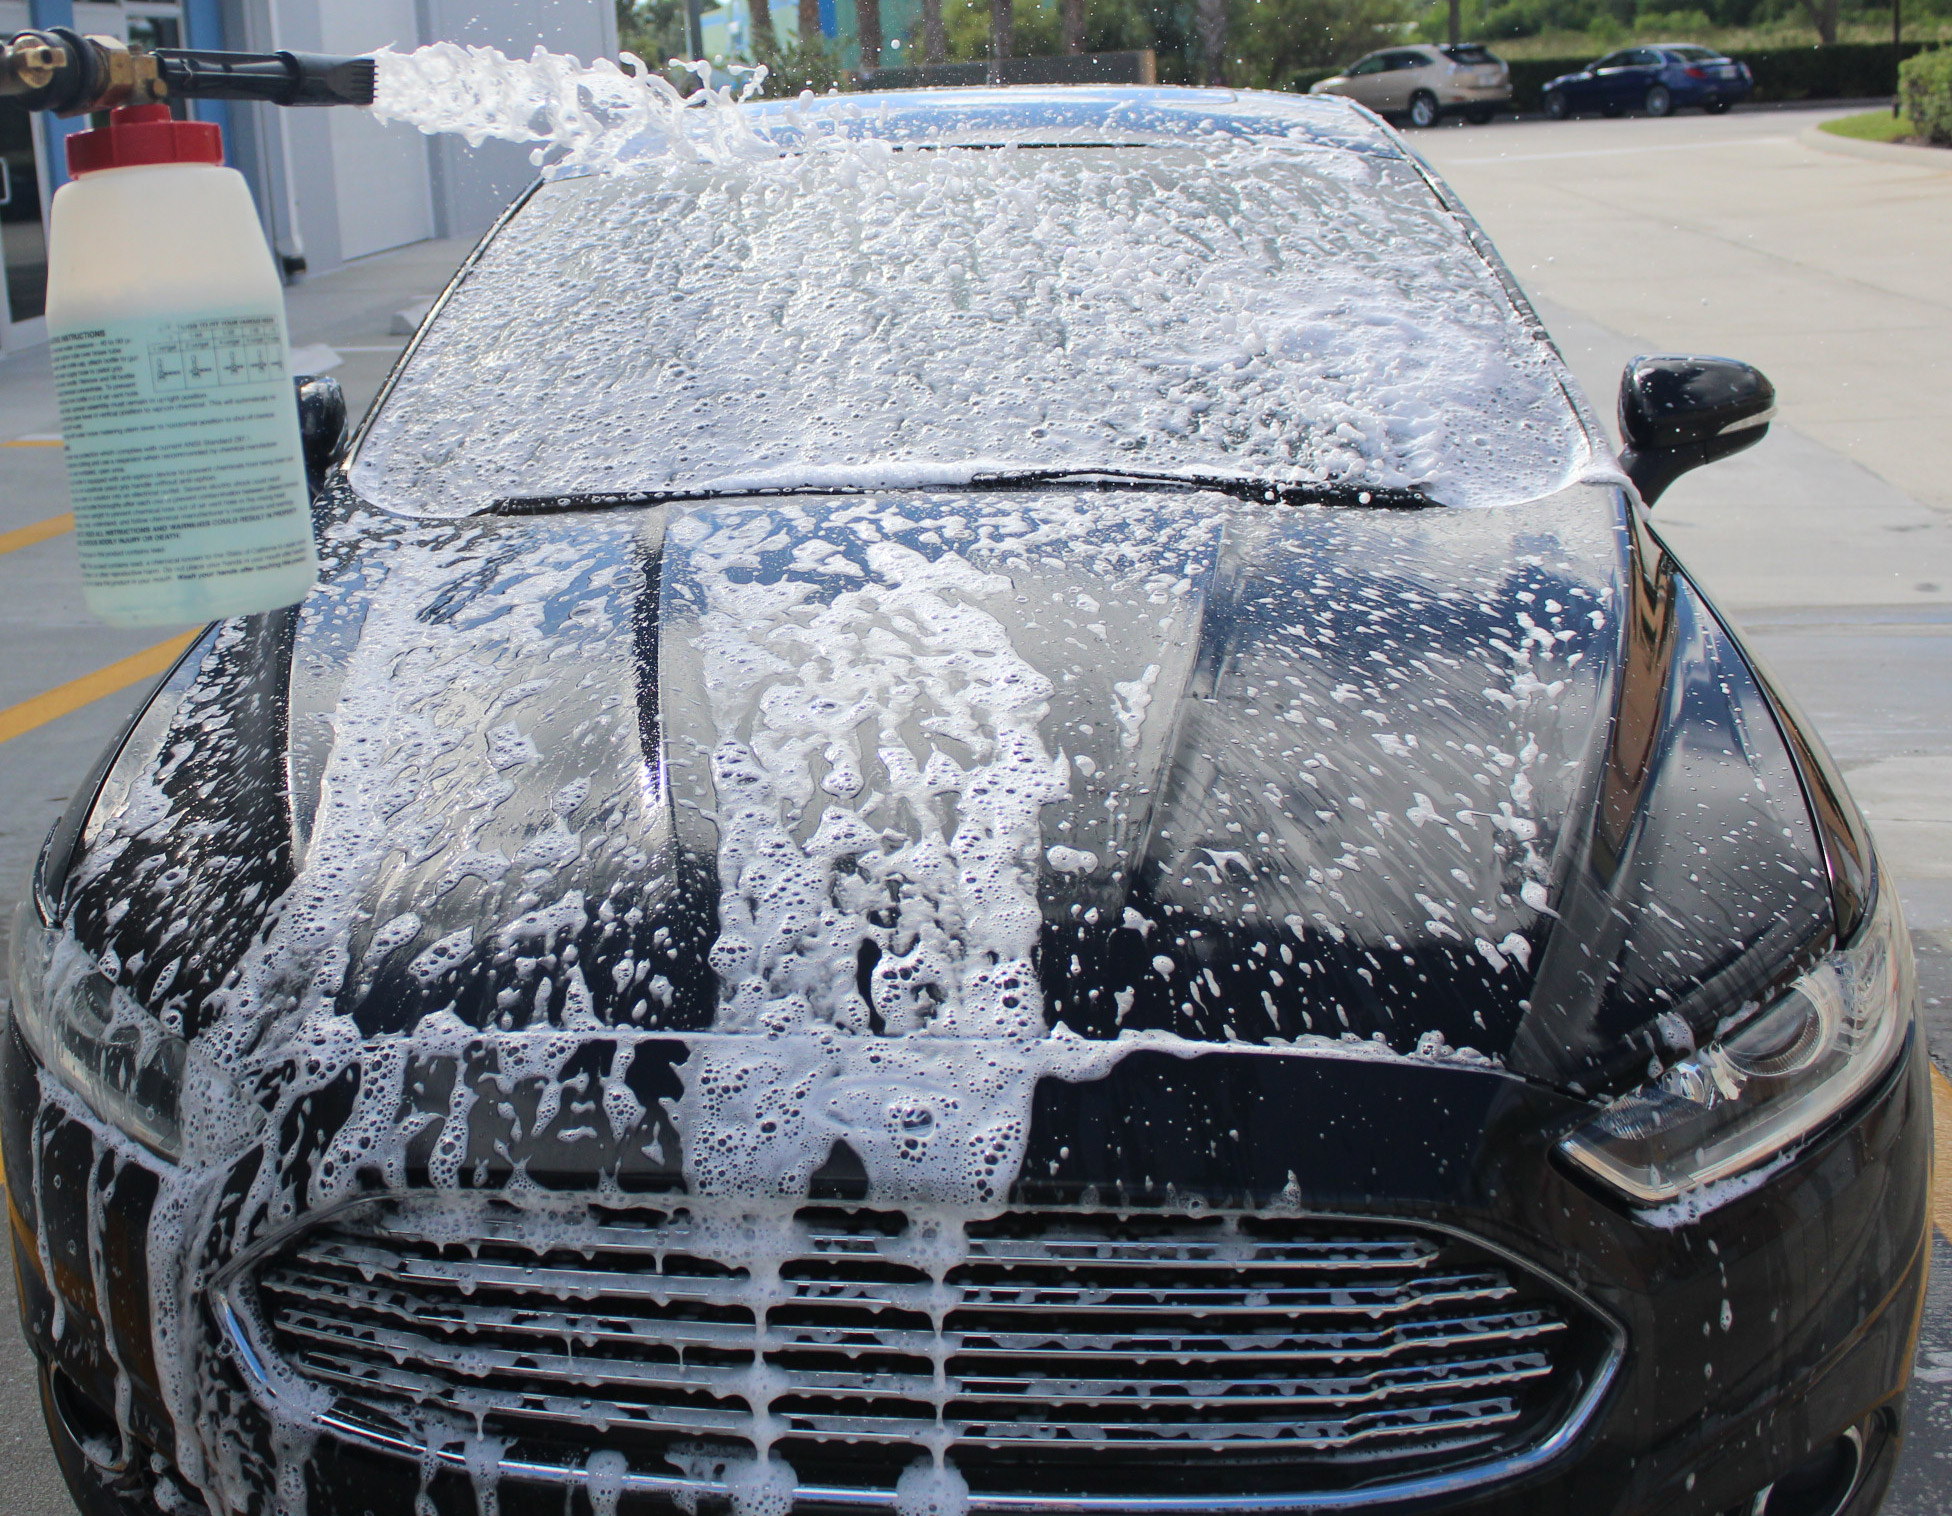
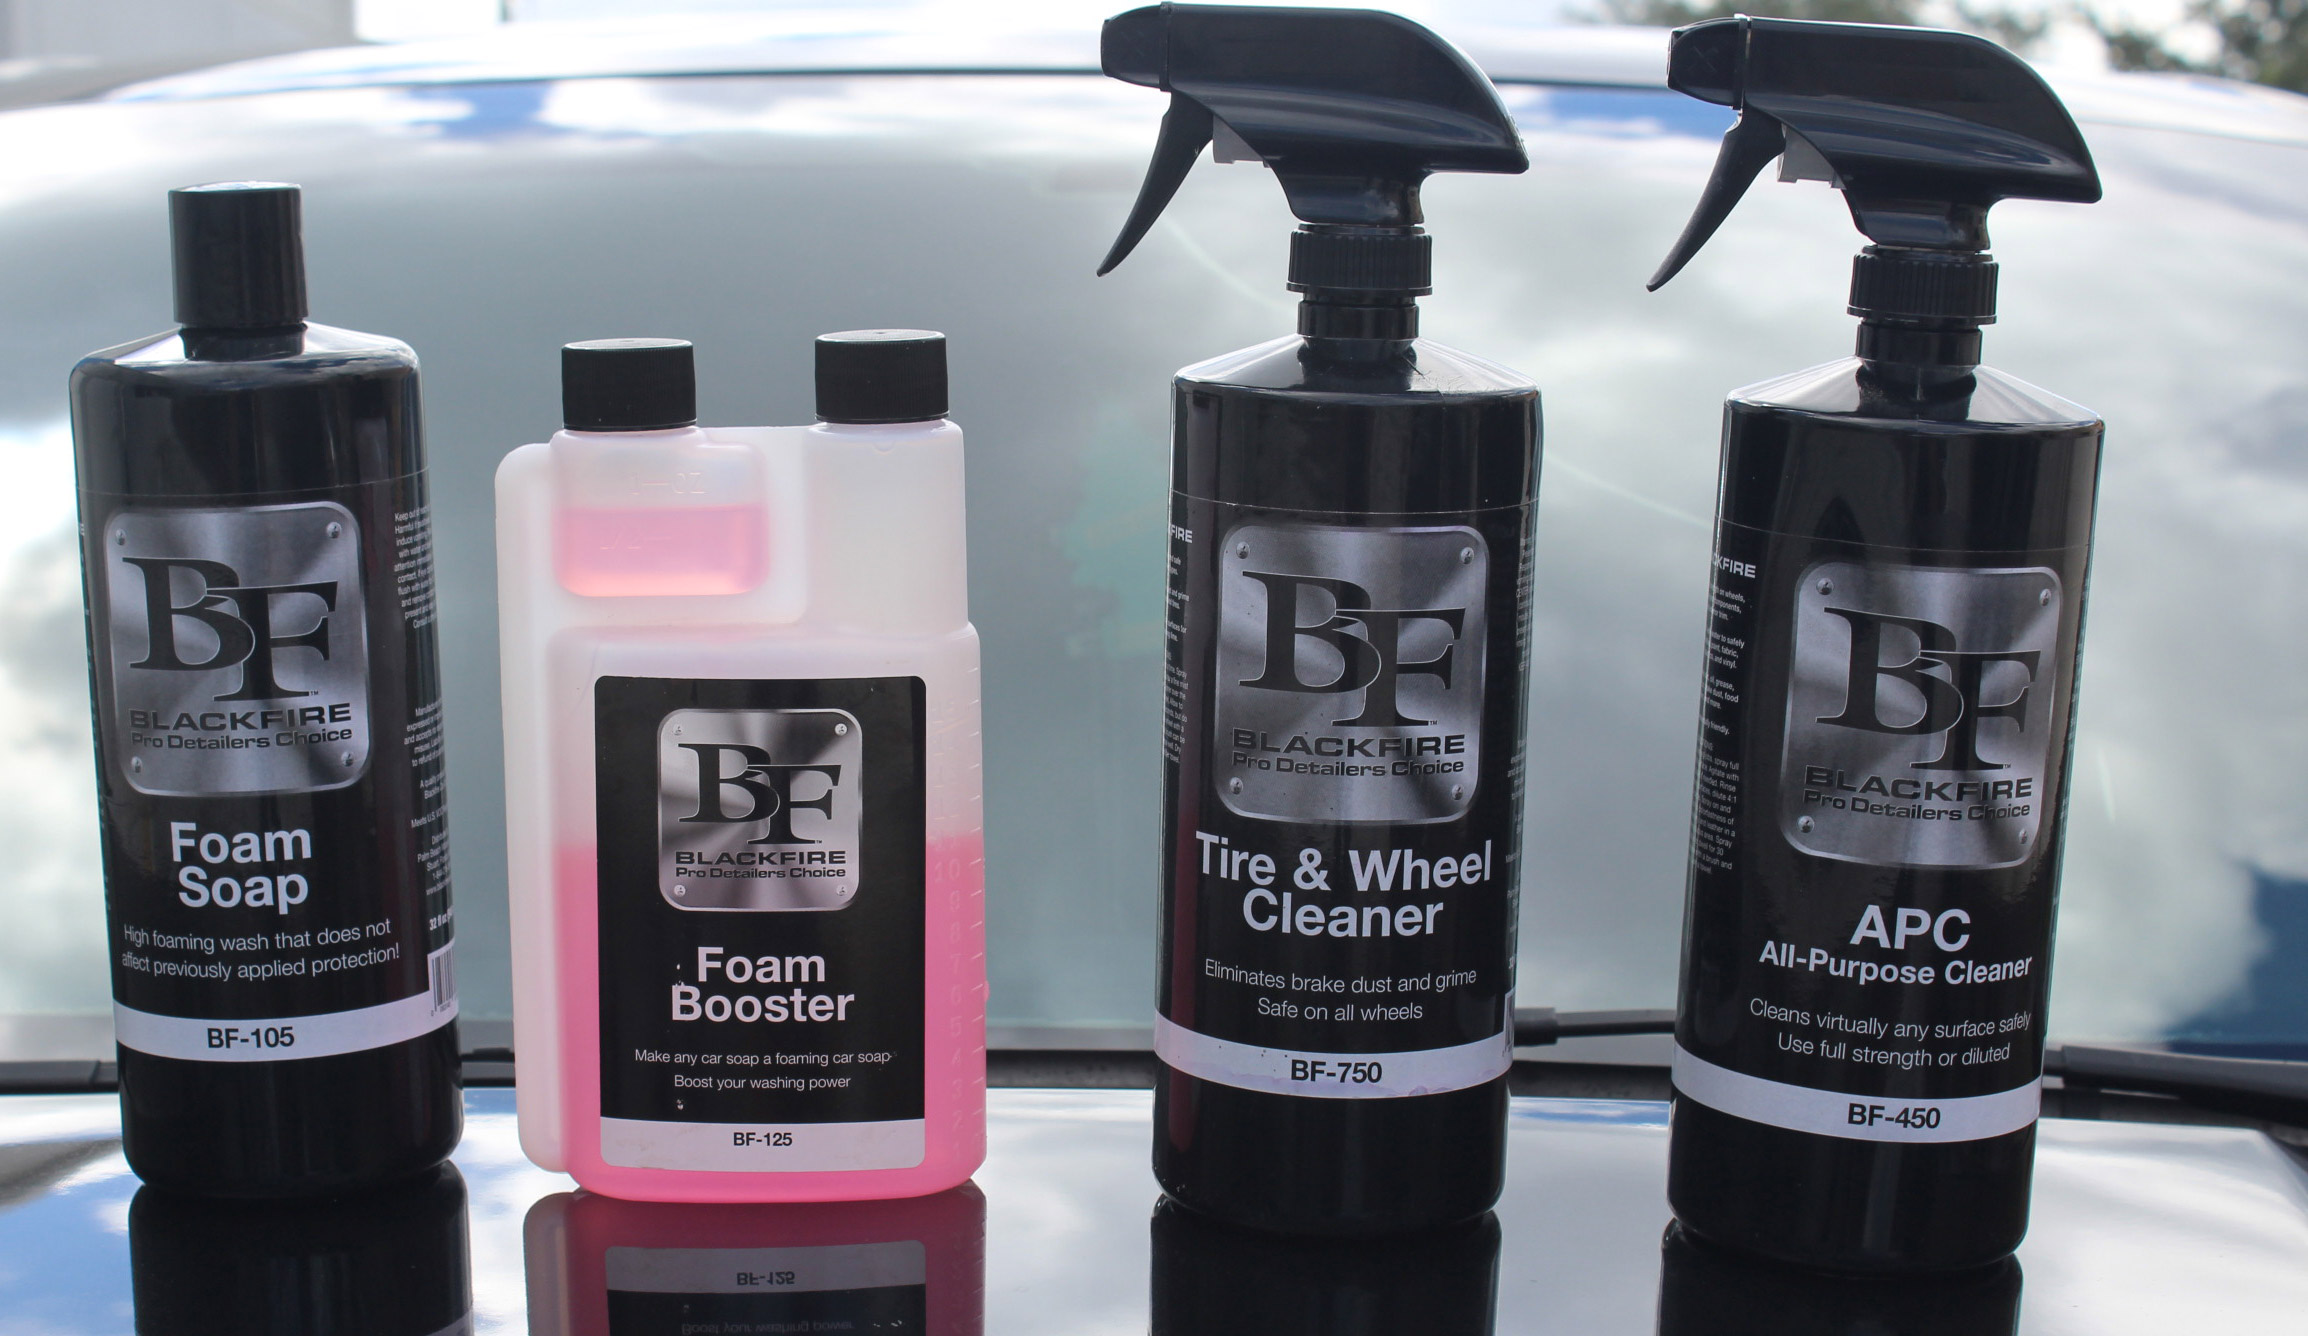
Once we have worked our way all around the car, we are going to give everything one last spray down to ensure that we have removed as much loose debris and contamination as possible. And that completes our pre-rinse! Now onto the pre-soak!" Step 2: The Pre-Soak Now that we have removed all the loose debris from the vehicle, we want to make sure we strip as much of the more stubborn contamination as possible. This is the contamination that will take more than just a bunch of pressure to remove but will also need a little chemical persuasion." If you already have a wax or sealant on your car and you do not intend on re-applying it, you may want to skip this step entirely. The cleaner is intended to strip the surface of road grime, so it may also strip your currently applied protection product as well. To accomplish said chemical persuasion" we will be using our BLACKFIRE APC All-Purpose Cleaner. Now, we won't just be pouring it all over the surface of the car, because that isn't going to give us an even and consistent distribution of product. This is why we will be using our pressure washer in conjunction with a Foam Cannon (this is an attachment for your pressure sprayer that will allow you to mix a cleaner with the water and generate a large amount of foam) to spray the surface down. Additionally, because we want the BLACKFIRE APC All-Purpose Cleaner to have as much time as possible to do its job, we are going to make sure it foams as much as possible! To do this, we are going to add a little bit of our BLACKFIRE Foam Booster to really make sure this cleaner foams-up nicely! To ensure that we have plenty of cleaning power and foaming potential, we are going to use the following amount of product:
• 2 oz. of BLACKFIRE APC All-Purpose Cleaner
• 1 oz. of BLACKFIRE Foam Booster We will add these to the cannister on our Foam Cannon and fill it the rest of the way with water. Now it's time to get to soaking! The purpose of this whole step is to let the BLACKFIRE APC All-Purpose Cleaner do most of the work. As such, we are really just making sure we completely coat the car with it. We are not concerned about spraying downward or moving top to bottom. We are just going to spray and evenly coat the entire car surface with a thick helping of road grime stripping suds!
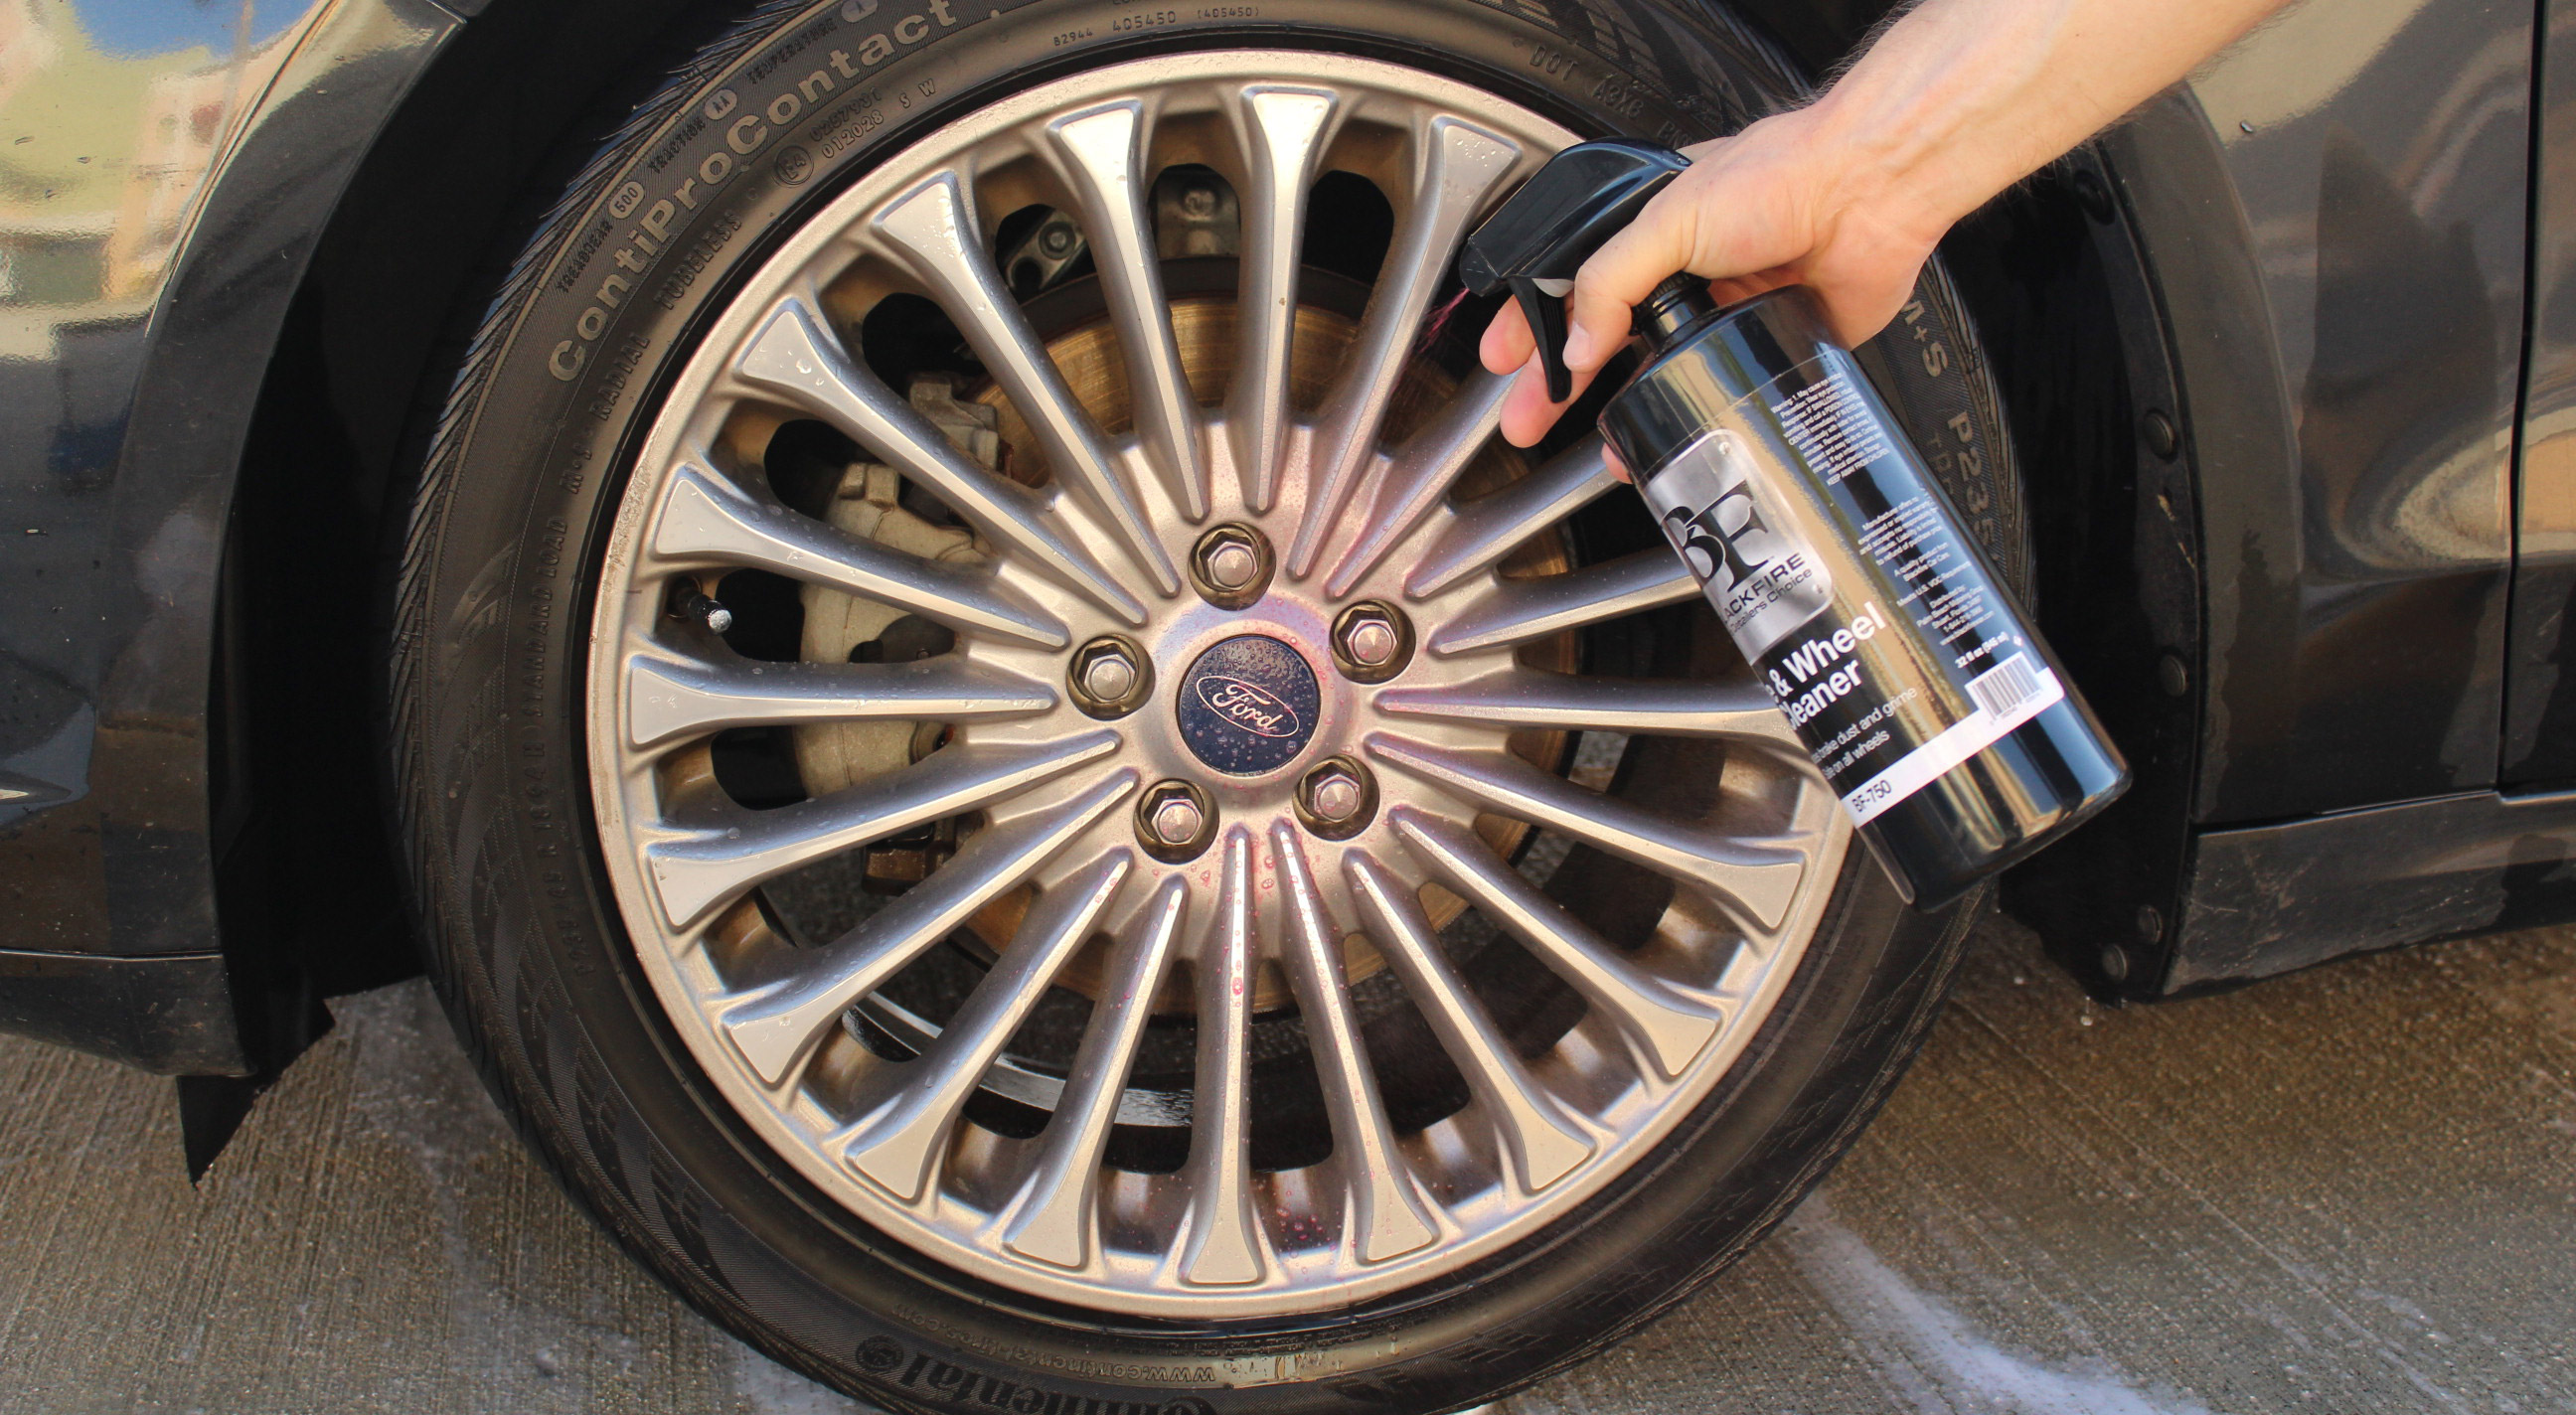
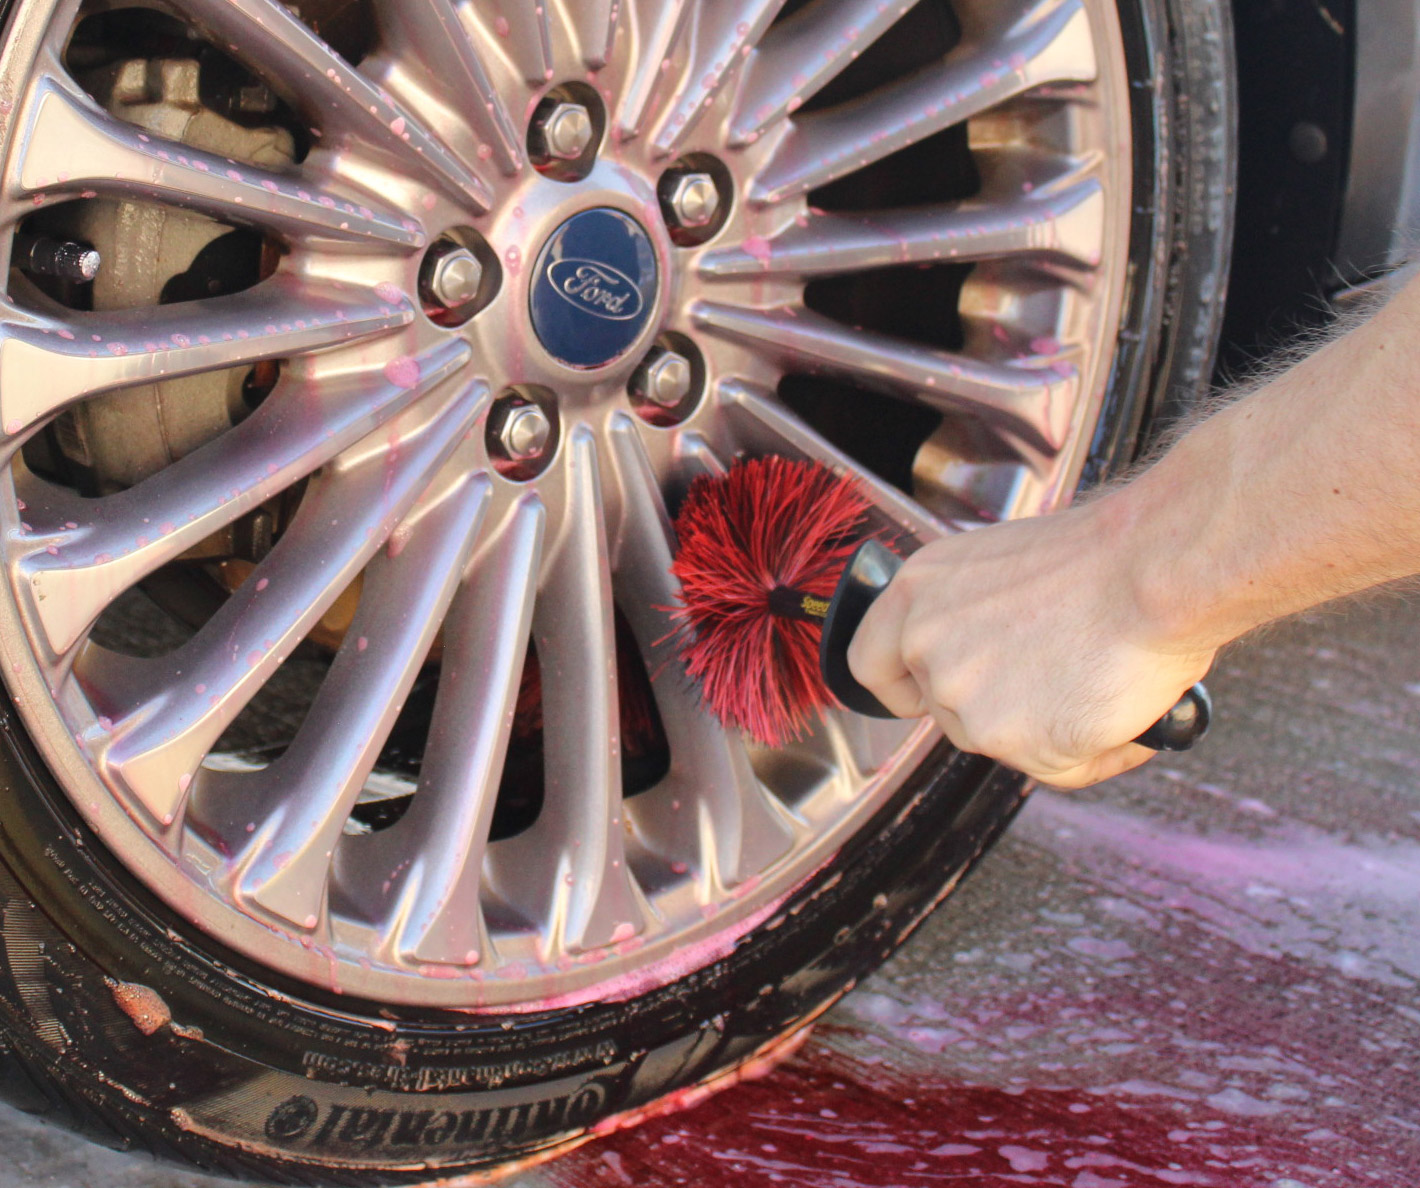
Now we are just going to let those chemicals do their thing for a few minutes before detaching our Foam Cannon and rinsing it all off the surface with plain water. Next up, the actual washing! Step 3: The Wash Now that we can be sure that the majority of the really nasty stuff is off the surface of the car, we can get down to the nitty-and-much-less-gritty washing step! Tire & Wheels: Just like with the pre-rinse, we are going to start with the tires and wheels for the same reason. They are the dirtiest and we are bound to kick up some serious gunk. Because the wheels and tires are the dirtiest, they will require a bit more powerful of a cleaner. The main consideration when cleaning wheels and tires is brake dust. Brake dust is the small metallic particles that are grinded off your brake pads when you use your brakes. These particles coat the entirety of your wheels and tires, where they slowly but surely corrode the surface. This is what will cause pitting on your wheels! To properly remove this, we need a chemical cleaner that will break down the brake dust and safely release it from the surface of your wheels and tires. Our BLACKFIRE Tire & Wheel Cleaner is exactly the cleaner you want to accomplish such chemical cleaning! As we will also need some proper agitation, we will be using some of our favorite brushes to do some scrubbing. For the wheels, we will be using the Speed Master Wheel Brush. For the tires, a Speed Master Tire Scrub Brush. And for the lug nut recesses, we will be using the Famous Brush. We will start with the wheels. We are going to spray a GENEROUS amount of our BLACKFIRE Tire & Wheel cleaner all over the surface of the tires and rims. We will let it sit for a bit so it will have plenty of time to bond with and remove as much of that brake dust as possible.
We will then start scrubbing the wheels thoroughly with our Speed Master Wheel brush. We want to make sure to get into every nook and cranny of our rims and provide ample amounts of scrubbing. The Speed Master Wheel Bush has a flexible stock that will even allow us to bend it to scrub the backs of the rims effectively!
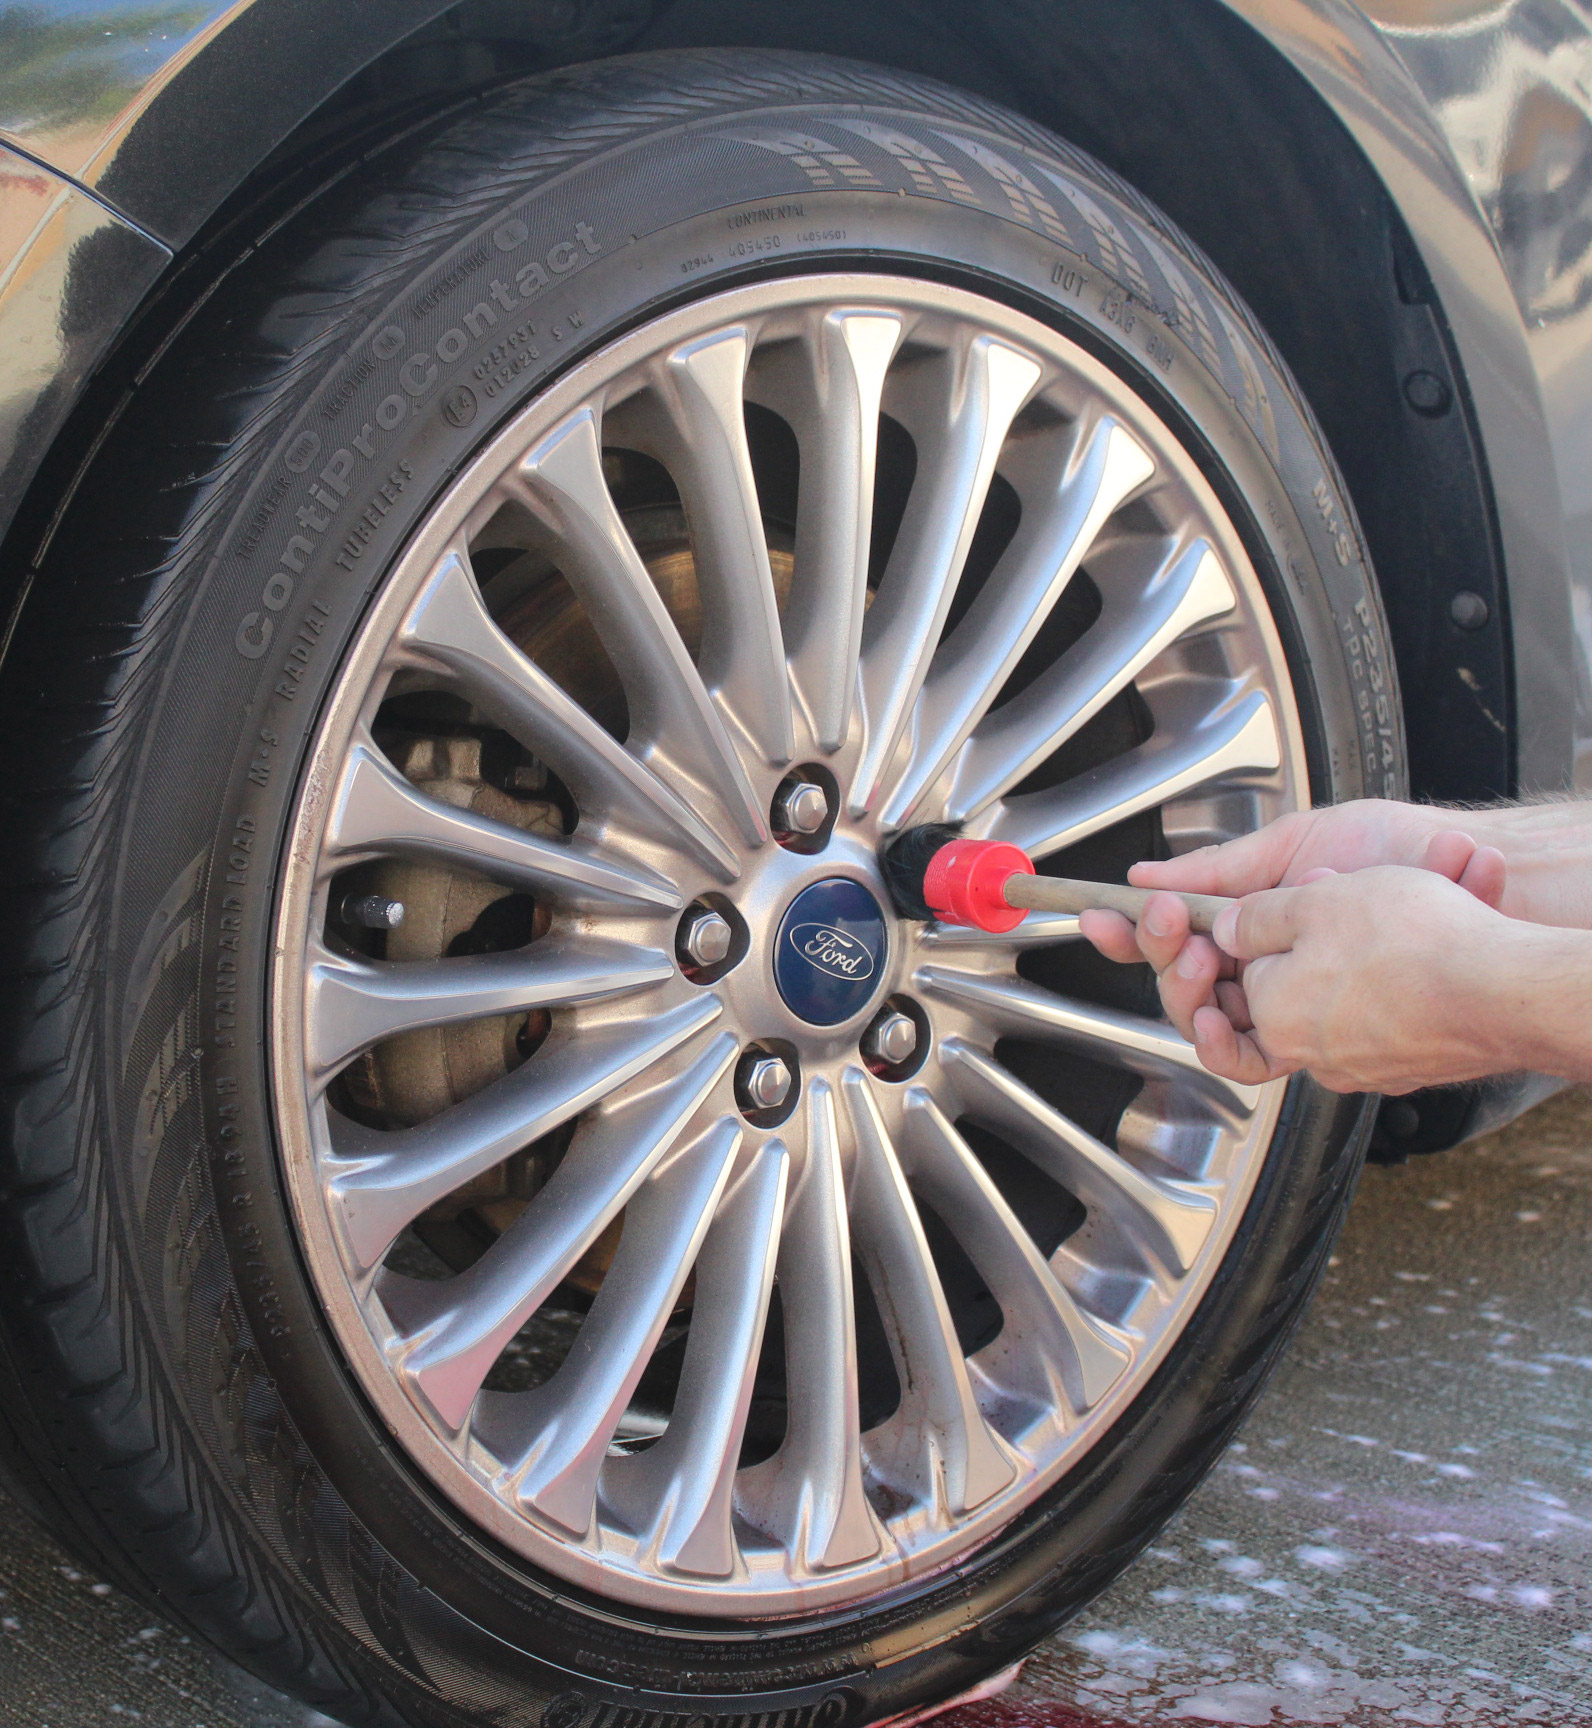
Next up, we will use our Famous Brush to really get into the lug nut recesses and clean everything out of there quickly and easily before moving onto the tires
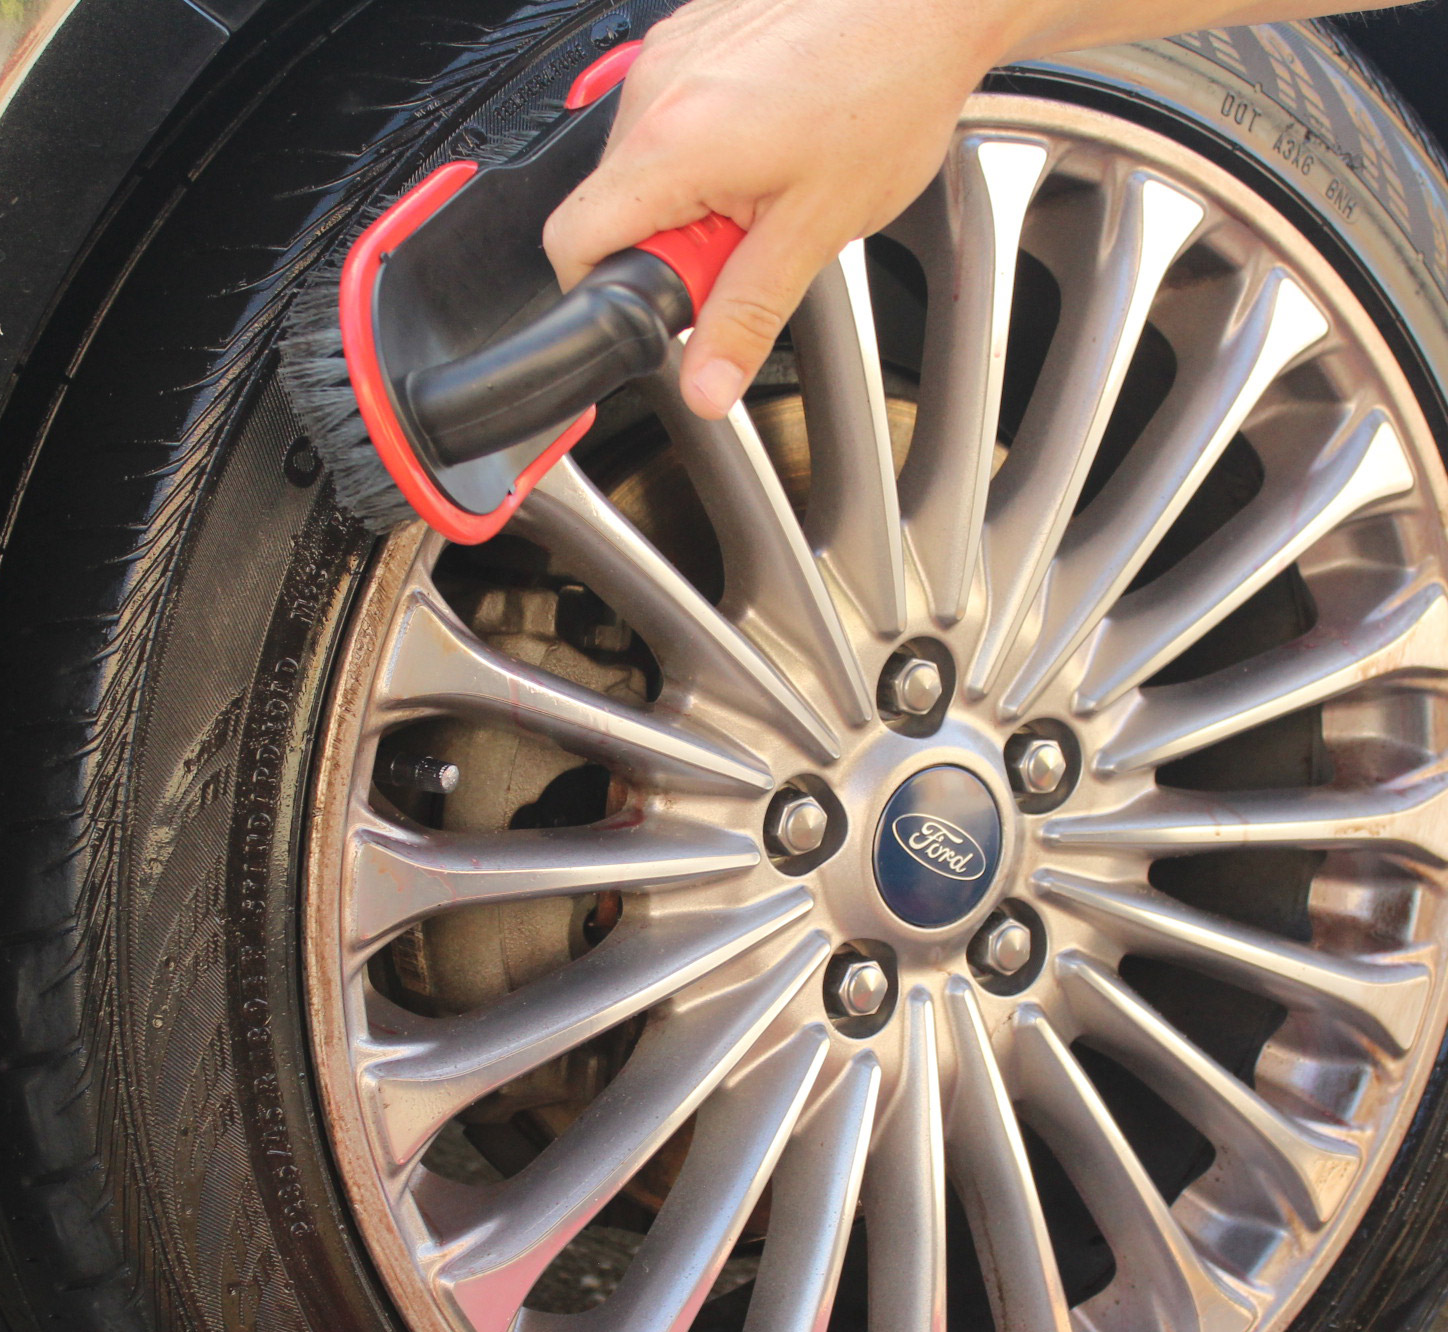
Using the Speed Master Tire Scrub Brush, we are going to agitate the surface of the tires. We aren't going to clean the actual treaded surface of the tires because those won't stay clean for very long anyway. Then give everything a good rinsing with the hose and you are good to go!
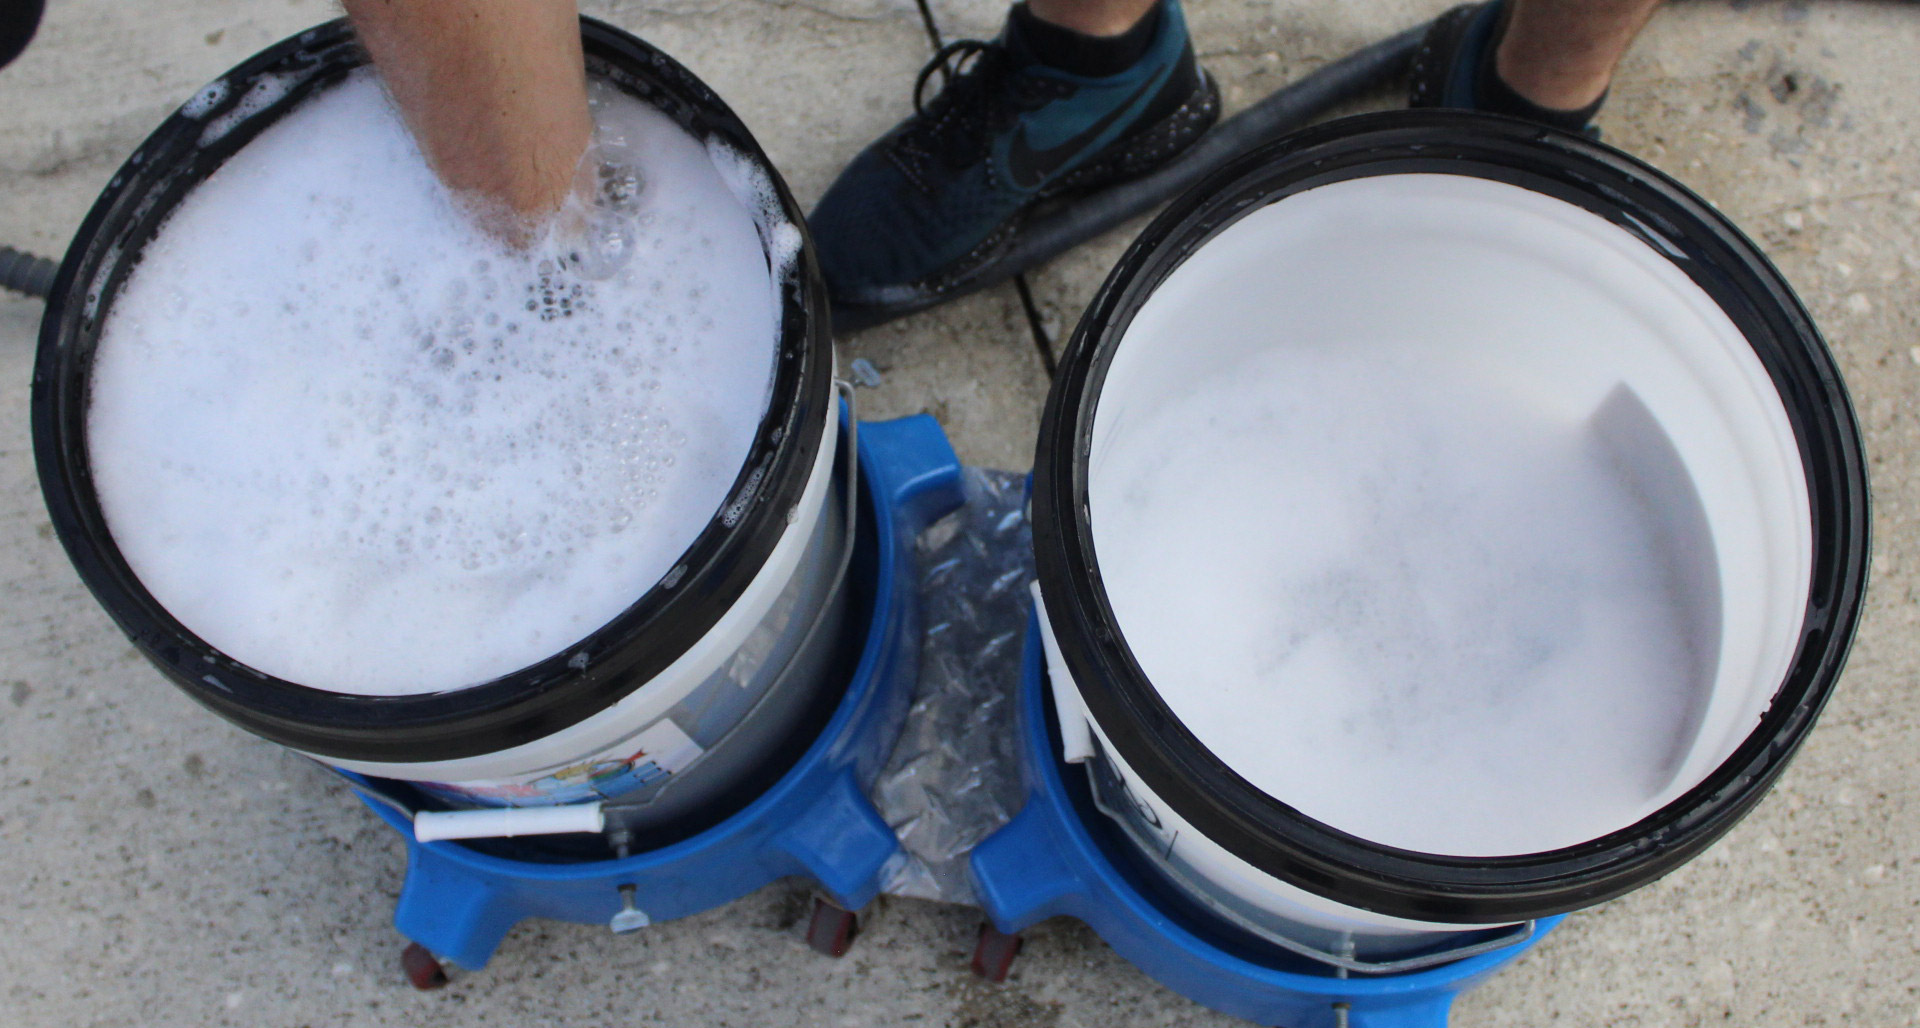
If your tires and wheels are particularly dirty, you may have to repeat this process. Washing the rest of the car: For the rest of the car, we are going to use a washing method that is probably a bit over the top compared to most washing routines. For our wash, we are going to use a combination of a Foam Gun wash (this is an attachment for a standard water hose. Similar to the Foam Cannon, but for hoses instead of pressure washers.) and the Two-Bucket System (a washing system that involves the use of one bucket for your car wash solution and another bucket for rinsing your mitt.) It is important to note that we are not doing this in direct sunlight or on a car that is particularly hot. If you cannot do so while you are washing, you should work in small sections and rinse often! Otherwise, the shampoo will dry on the surface and that is a pain. We are going to be using two different kinds of soap for this wash. The soap we will use in our Foam Gun is our BLACKFIRE Foam Soap and the soap we will use in our bucket is our BLACKFIRE Car Wash. The BLACKFIRE Foam Soap will foam up more easily in the foam gun, ensuring that we get an even coat. The BLACKFIRE Car Wash will provide more lubricity to our wash mitt to reduce the risk of washing-induced swirls. We will add 2 ounces of BLACKFIRE Foam Soap to our Foam Gun cannister and fill the cannister the rest of the way with water. We will set this to the side while we prep our buckets. We will be using 2 standard 5-gallon buckets for our wash, both of which have a Grit Guard in the bottom to ensure any dirt or grit does not find its way back onto the mitt while we dip our mitt in the bucket. Our buckets are two separate colors to ensure that we do not accidently mistake them during the wash. One of them is our Wash" bucket. In this bucket, we will add 2 ounces of BLACKFIRE Car Wash. Then, using a strong jet of water, we fill the bucket the rest of the way with water. The strong jet of water will make sure that the shampoo is properly diluted and will generate as much foam as possible. We will then chuck our wash mitt (which is a Supreme Micro-Chenille Wash Mitt) in the bucket and let it soak for a few. Our Rinse" bucket will simply be filled with water. Now we will attach our Foam Gun to our water hose and begin the washing process.
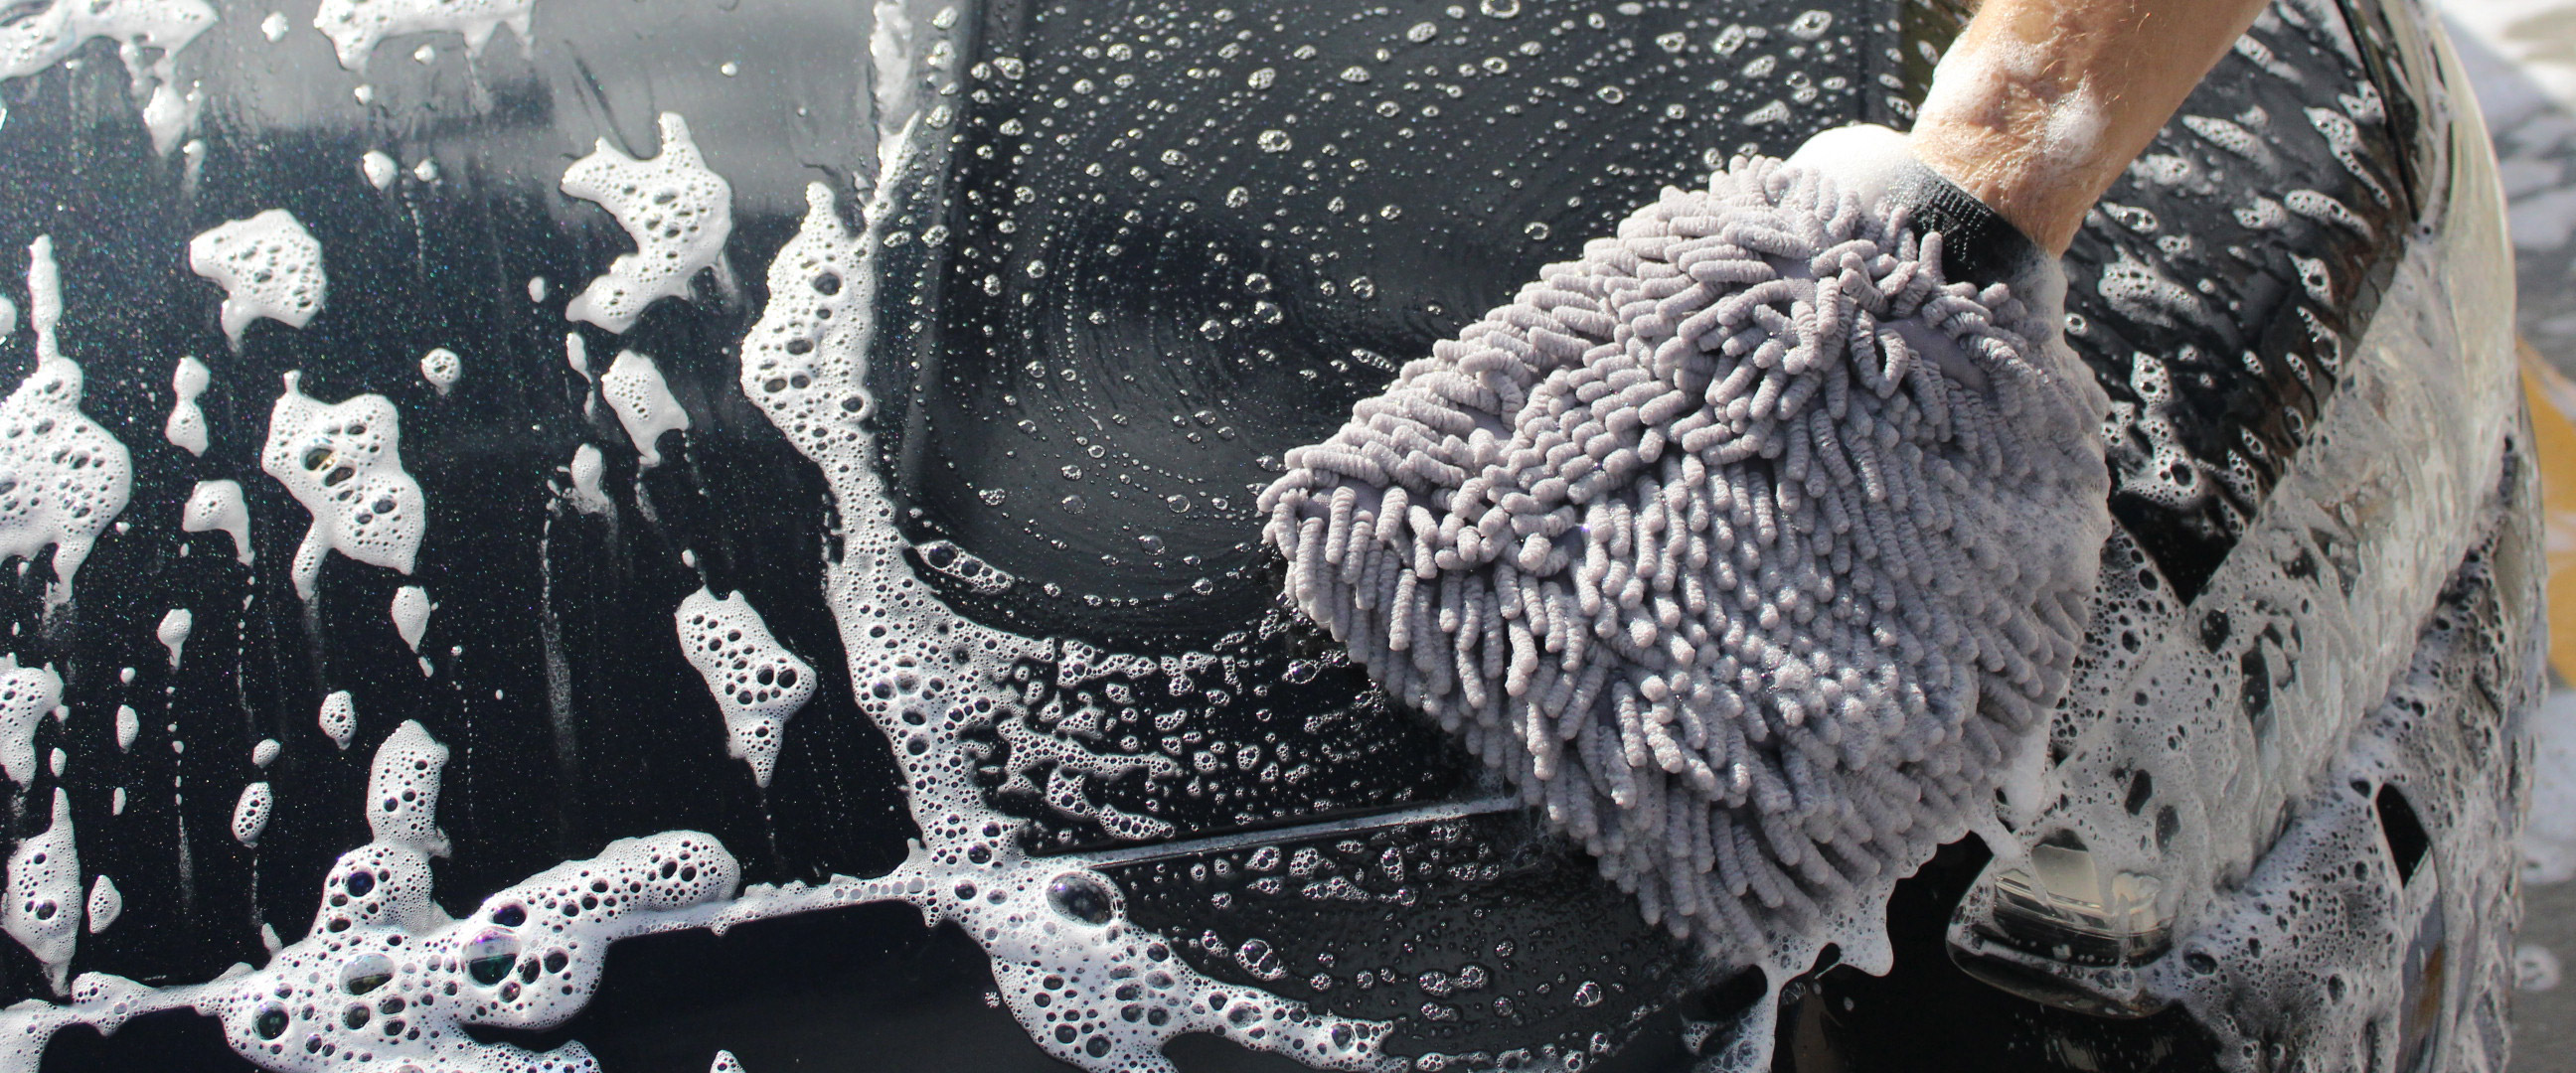
The first thing we are going to do is give our car a good heaping helping of foamy BLACKFIRE Foam Soap with our Foam Gun. This will make sure the surface is lathered properly and further lubricated for the washing process. Now we will get to work with the mitt itself! Again, just like with the pre-rinse, we want to start at the top and work our way down to avoid any contaminants from replanting on lower panels. As we go through the wash, we are FREQUENTLY rinsing our wash mitt off in the Rinse" bucket to remove any dirt and contaminants that it has picked up. We are then soaking it in our Wash" bucket to allow it to absorb more of the lubricating BLACKFIRE Car Wash solution. We are never going longer than the time it takes to wash a single panel without doing so.
As we work our way down, we will make sure to apply enough agitation to remove the most stubborn contamination from the surface. We will pay special attention to areas that have a higher concentration of contaminants like the hood, the grille, the windshield, the rocker panels, and the backs of the rear-view mirrors.
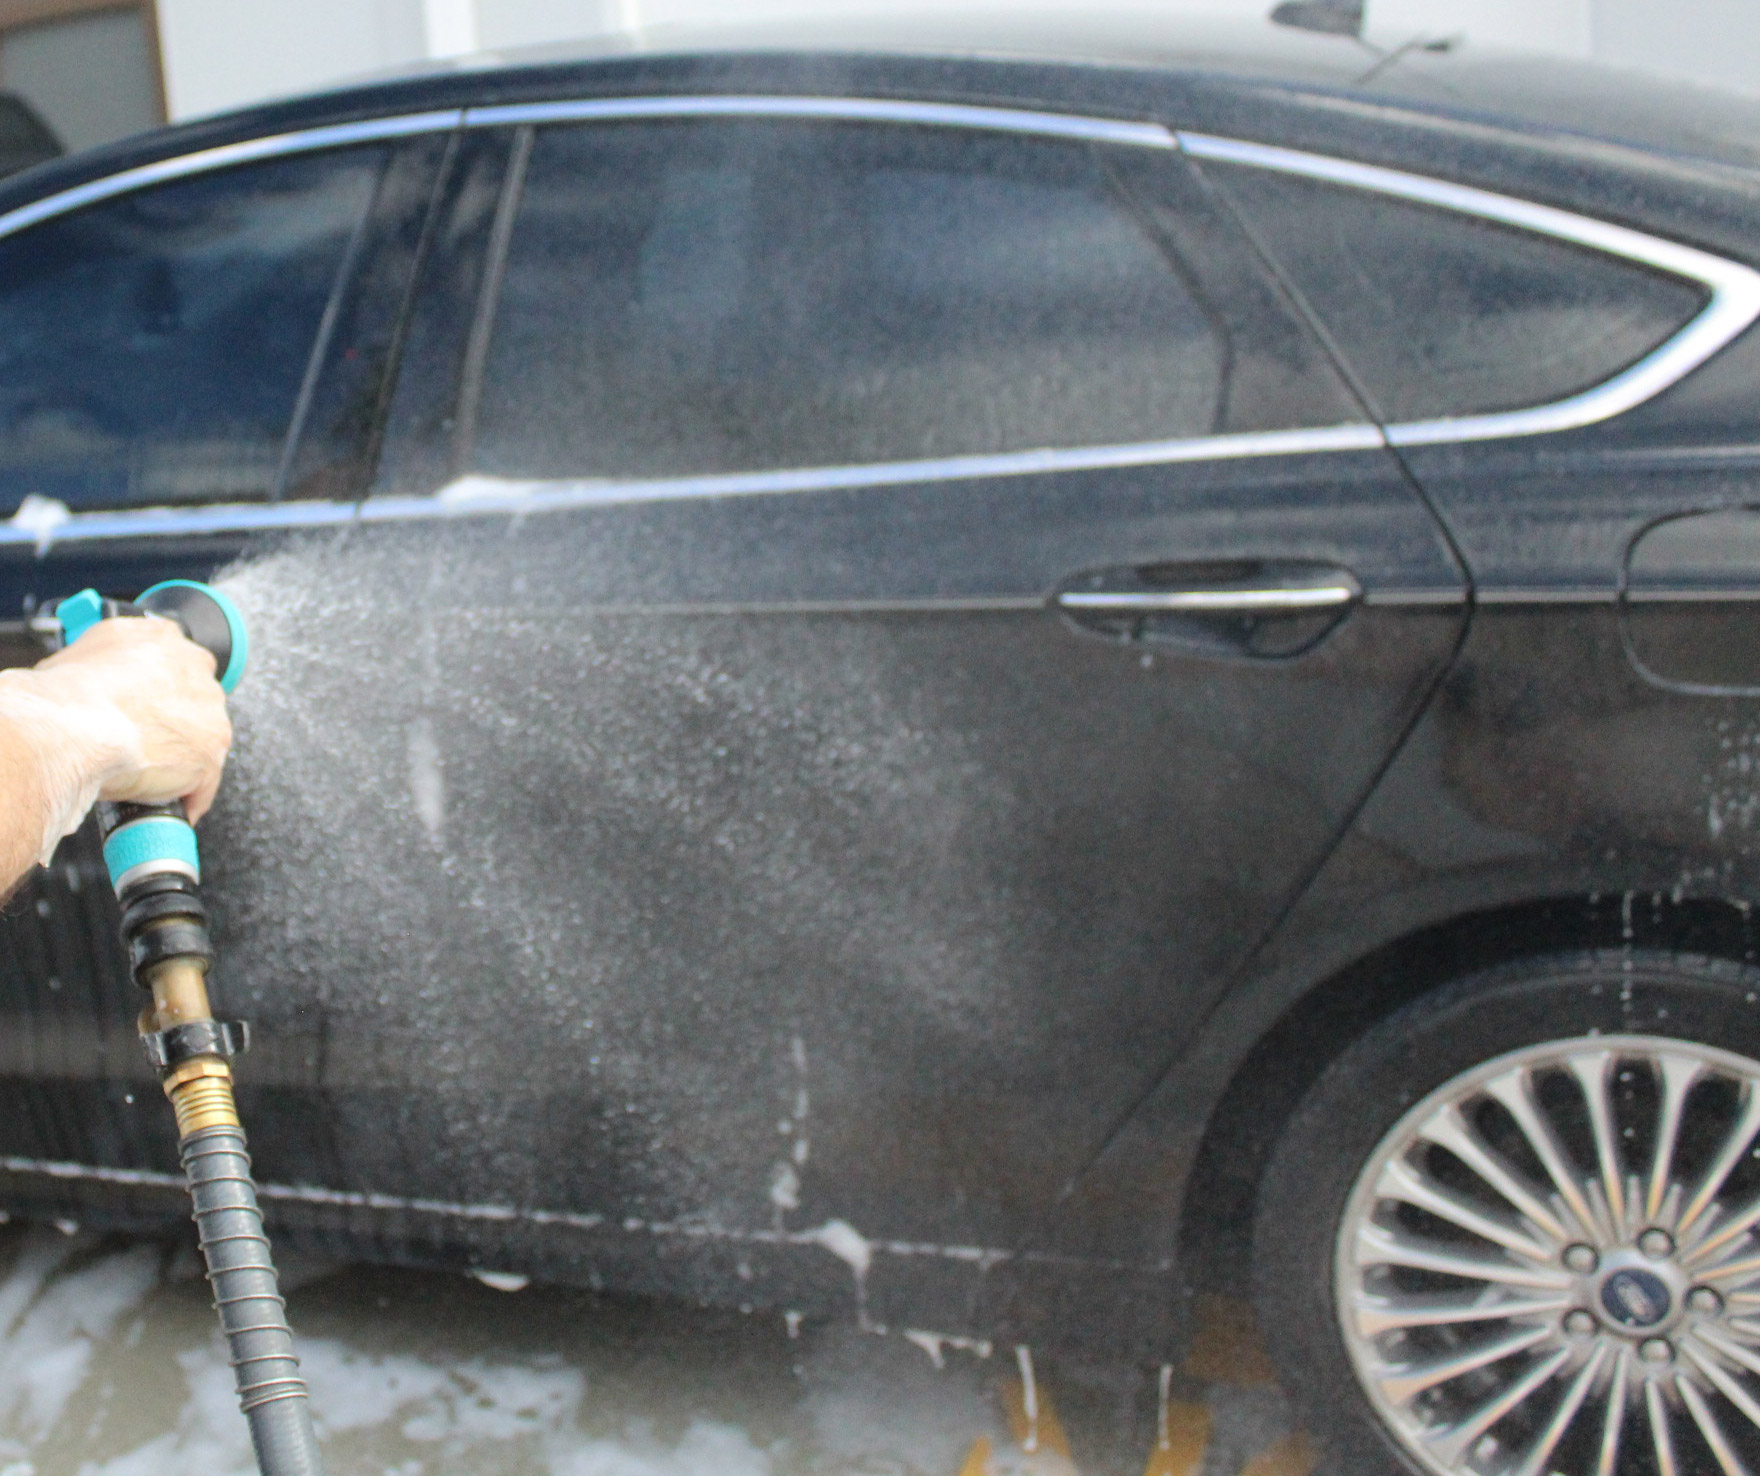
Once every surface of the car has been thoroughly washed and agitated with the mitt, we will rinse off the entirety of the car and make sure there are no more suds or car shampoo on the surface. Now we will inspect the car's various surfaces to make sure that all visible contaminants and debris are sufficiently removed. We will spot-clean any areas that are not up to snuff and rinse them off again until the entire car is as close to spotless as we can possibly get it!
Drying: Now we want to make sure to get every drip, drop, and dribble of water off this car quickly. If we do not dry the car completely, then the water will remain on the surface and evaporate. The problem with that is that even though the water evaporates, the minerals IN the water do not. The minerals that are left on the surface are not so affectionately referred to as water-spots". Nobody likes water-spots, so we will do all we can to avoid them! We are going to be using a combination of our Cobra Guzzler Towels and our BLACKFIRE Car Dryer to rid the car of water as soon as possible to avoid water-spots. If this was a maintenance wash and we still had a layer of hydrophobic protection on the car (like BLACKFIRE SiO2 Spray sealant), we would simply be able to use the BLACKFIRE Car Dryer and blast the water off easily. However, because this is a wash on a car that has never been detailed before, the water will not come off that easily, unfortunately. We will use one of our Guzzler towels (which are capable of absorbing up to 7 times their weight in water!) and skim dry the surface by dragging the towel over the surface of the car. Don't worry, it is a microfiber towel, so we won't have to worry about scratching the surface. This process will get rid of the majority of the water.
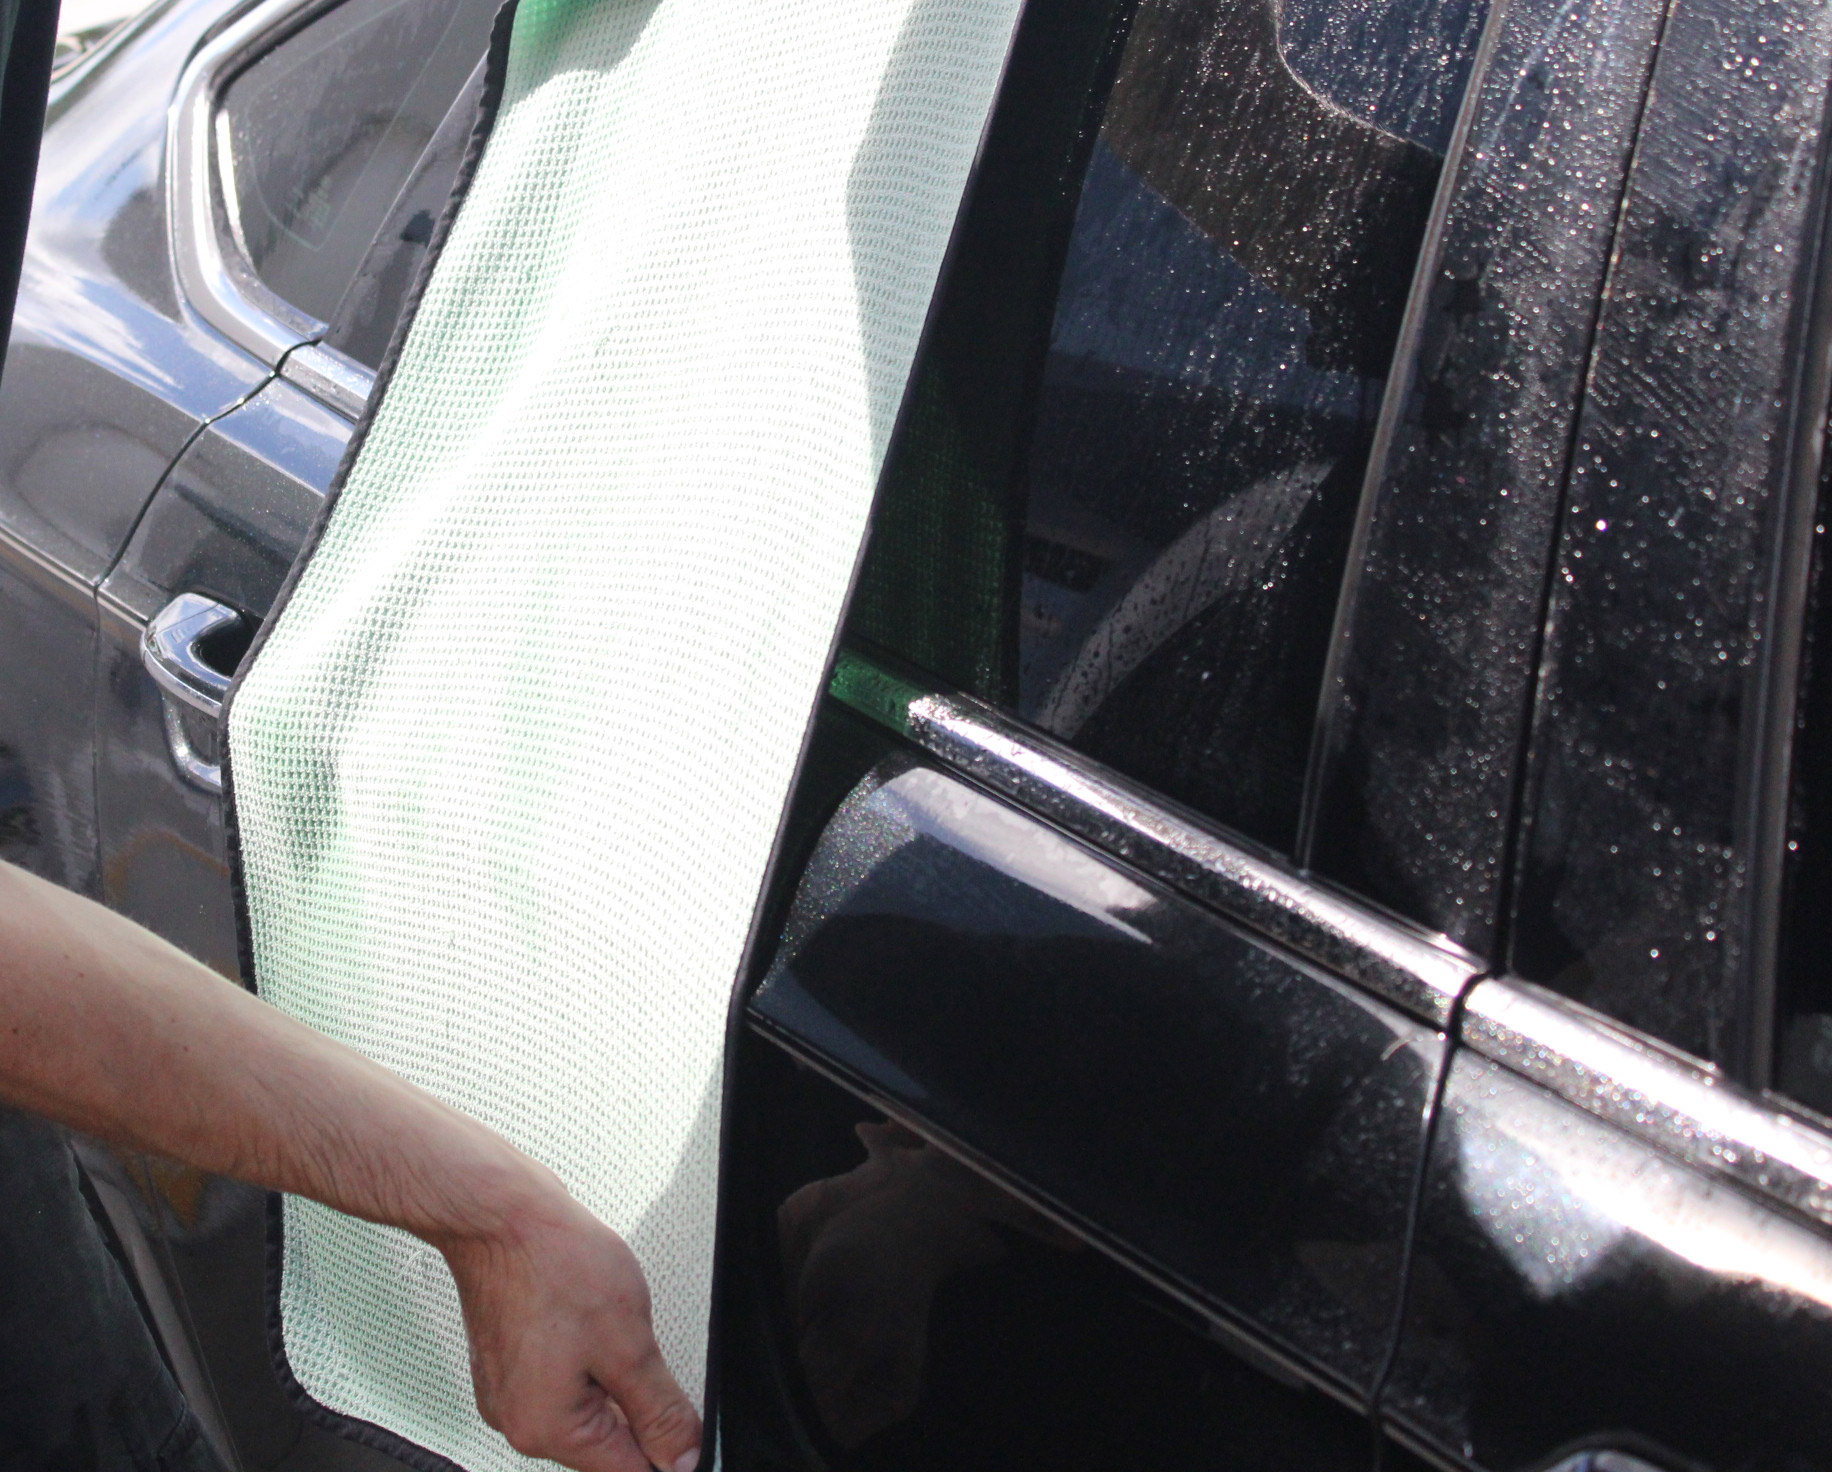
Next, we will take our second Guzzler towel and work on drying off any water that may have been left behind by the first towel's pass. Now we will use our BLACKFIRE Car Dryer to dry out all the miniscule nooks and crannies like the door jambs, the grille, and in between our bumpers. We may have to do another pass with a Guzzler around these areas afterwards in case any water was splattered out onto the rest of the car. Step 4: The Admiration Now all we have to do is sit back and look at the results of our thorough and carefully executed car wash!
Now this car is stripped clean and ready for everything else we have in store for it! Join us on our next installment in this informational series where we will go over Paint Decontamination! In this section, we will be going over how to remove all the embedded contamination in your glass and paint using an iron remover and a detailing clay mitt!
By: Robert S. @ BLACKFIRE | 10-23-2019
In this installment, we will be going over how to wash your car in the most effective manner. Because we are working on a car that has never been professionally detailed before, our method may be a lot more extensive than the method you use. However, we believe that this overview will help you make a breakthrough in your current washing routine and help you achieve better results, even if you don't use our exact method! The first and one of the most important steps in a detailing ritual is the weekly (ideally) car wash. As car paint and the detailing industry has evolved, so has the car washing routine. Gone are the days of lathering your automotive pride and joy up with whatever dish soap you have lying around the kitchen and rubbing it down with a dirty old sponge that has been fermenting in your garage for years. If you want to achieve the best results, your approach to your car wash must be more nuanced and tactical than that! To that end, we are going to be breaking down our multi-step, all-inclusive car washing method that is guaranteed to leave your vehicle spotless! Step 1: The Pre-Rinse As you are driving your car down the road (or even if it's just sitting in your drive-way), there is an endless number of contaminants to which it is being exposed. Contaminants such as road grime, tar, bird droppings, insect remains, mud, dirt, oil, iron particles, pollen, etc. The list is nearly endless! And these contaminants aren't the type to commit a hit-and-run, they are going to stay and latch onto your paint. They will slowly but surely eat away at your car's precious clear-coat and leave permanent damage that is nearly irreparable! What's worse is that if you just wash your car while it is ridden with all of these contaminants, you risk rubbing them across the surface, causing marring and scratching in the process. It is for this reason that a pre-rinse is extremely important! The goal of the pre-rinse is to rid your car of as many of these contaminants as possible before ever touching a sponge or mitt to the surface. Keep in mind, a pre-rinse will not be able to get 100% of the contamination off your car, but it will do a great job of removing the loose debris that collects on all the surfaces!
Because we want to make sure that we are removing as much loose debris as possible, we are going to be using a pressure washer to perform our pre-rinse. Don't worry, you won't have to worry about damaging your car by using a pressure washer. Car's are more than tough enough to stand up to the power of a pressure washer, but that loose debris is not! If you do not have access to a pressure washer or are still feeling a bit weary about the idea of trying it, you can perform a pre-rinse with a simple water hose. It is important to remember though, a water hose will NOT be able to remove as much debris as a pressure washer can, thus you will have to be more careful when you do eventually get to the washing step. It is also a good idea to use a hose instead of a pressure washer if you already have a layer of wax or sealant on your paint and you do not intend on reapplying after the wash. The pressure washer could strip away some or all of your currently existing protection product. Whenever you are using a pressure washer, you want to be extremely careful about which pressure washer you use and how you use it. Pressure washers are powerful tools and if they are not used correctly, they can cause some serious damage. The most important factor to take into consideration is the power of the pressure washer you are using. As a general rule, gas powered pressure washers are much more powerful and more intended to for the surface of your driveway, not your car. It is for this reason that we are using an electric pressure washer. Another consideration when determining which pressure washer to use is the GPM (Gallons Per Minute) of the pressure washer. For the purposes of car washing, you will want a pressure washer that has a GPM of anywhere from 1.4 to 1.6. This will give you enough water to actually clean the surface effectively. You also need to make sure that the PSI (Pounds per Square Inch) is adjusted to a level that is powerful enough to get the job done, but not powerful enough to peel the paint. Paint hardness varies from car to car, but usually you'll want to stay between 1200 and 1900 PSI. Most electric pressure washers allow you to adjust the PSI easily, so just make sure it is set to the right level before you begin. The last equipment specification you want to take into consideration is the spray nozzle you'll be using. The nozzle changes the spray pattern of the pressure washer to either be narrower or wider. The jet of water will get more concentrated and thus harsher as the jet gets narrower. The ideal nozzle to use when doing a pressure washer pre-rinse is usually a 25-degree nozzle. This will give you enough pressure to blast away the loose debris but not so much that you'll be cleaning your car's paint off your driveway a couple minutes later. Now that you know all the equipment considerations, it is time to go over the actual pre-rinse technique! We know this probably goes without saying, but we will say it anyway. DO NOT POINT THE PRESSURE WASHER AT YOURSELF OR ANYONE ELSE! These things pack a serious punch and are extremely dangerous should they be used on any person! Also, DON'T FORGET TO ROLL UP YOUR WINDOWS AND TIGHTLY SHUT ALL THE DOORS AND THE TRUNK! You don't want to drown your precious interior! As a general practice, you should always test the pressure of your pressure washer on the ground before actually using it on your car. Think of this as a fail-safe to make sure that you have set the pressure correctly prior to using it on your car. If it kicks too much, re-check the PSI setting on your pressure washer. Now, as we have not ever worked on this car before, we will want to approach the pre-rinse with plenty of caution. Because we don't know how this car will react, we are going to start from a bit further back to make sure the jet isn't as strong right off the bat. We are starting about 4-5 feet away from the car and slowly moving forward to reduce the risk of damage as much as possible. Usually, we will not ever get closer than about 1 foot away from the car. The first thing we are going to rinse are the tires and wheels. These tend to be the dirtiest part of the car and will kick up the most debris, so if we did them last, you would have to redo the whole paint surface again. Another good reason to tackle the wheels first is because they take longer. If we do the wheels last, the water on the rest of the car would dry and potentially cause water spots before we finished on the wheels.
When working on the wheels, we will be getting a bit closer to them than we will the paint. This is because wheels are much dirtier and thus will require more power to rinse off. Then we are going to start at the top of the car and slowly work our way down. This will ensure that as we remove debris, we are not re-contaminating an already cleaned lower panel. We are also being sure to point the jet of water downward as we work. By doing so, we are pushing the debris in the direction we want it to go, down. Otherwise, we are risking the contaminants being launched onto another panel that we have already cleaned.
Once we have worked our way all around the car, we are going to give everything one last spray down to ensure that we have removed as much loose debris and contamination as possible. And that completes our pre-rinse! Now onto the pre-soak!" Step 2: The Pre-Soak Now that we have removed all the loose debris from the vehicle, we want to make sure we strip as much of the more stubborn contamination as possible. This is the contamination that will take more than just a bunch of pressure to remove but will also need a little chemical persuasion." If you already have a wax or sealant on your car and you do not intend on re-applying it, you may want to skip this step entirely. The cleaner is intended to strip the surface of road grime, so it may also strip your currently applied protection product as well. To accomplish said chemical persuasion" we will be using our BLACKFIRE APC All-Purpose Cleaner. Now, we won't just be pouring it all over the surface of the car, because that isn't going to give us an even and consistent distribution of product. This is why we will be using our pressure washer in conjunction with a Foam Cannon (this is an attachment for your pressure sprayer that will allow you to mix a cleaner with the water and generate a large amount of foam) to spray the surface down. Additionally, because we want the BLACKFIRE APC All-Purpose Cleaner to have as much time as possible to do its job, we are going to make sure it foams as much as possible! To do this, we are going to add a little bit of our BLACKFIRE Foam Booster to really make sure this cleaner foams-up nicely! To ensure that we have plenty of cleaning power and foaming potential, we are going to use the following amount of product:
• 2 oz. of BLACKFIRE APC All-Purpose Cleaner
• 1 oz. of BLACKFIRE Foam Booster We will add these to the cannister on our Foam Cannon and fill it the rest of the way with water. Now it's time to get to soaking! The purpose of this whole step is to let the BLACKFIRE APC All-Purpose Cleaner do most of the work. As such, we are really just making sure we completely coat the car with it. We are not concerned about spraying downward or moving top to bottom. We are just going to spray and evenly coat the entire car surface with a thick helping of road grime stripping suds!
Now we are just going to let those chemicals do their thing for a few minutes before detaching our Foam Cannon and rinsing it all off the surface with plain water. Next up, the actual washing! Step 3: The Wash Now that we can be sure that the majority of the really nasty stuff is off the surface of the car, we can get down to the nitty-and-much-less-gritty washing step! Tire & Wheels: Just like with the pre-rinse, we are going to start with the tires and wheels for the same reason. They are the dirtiest and we are bound to kick up some serious gunk. Because the wheels and tires are the dirtiest, they will require a bit more powerful of a cleaner. The main consideration when cleaning wheels and tires is brake dust. Brake dust is the small metallic particles that are grinded off your brake pads when you use your brakes. These particles coat the entirety of your wheels and tires, where they slowly but surely corrode the surface. This is what will cause pitting on your wheels! To properly remove this, we need a chemical cleaner that will break down the brake dust and safely release it from the surface of your wheels and tires. Our BLACKFIRE Tire & Wheel Cleaner is exactly the cleaner you want to accomplish such chemical cleaning! As we will also need some proper agitation, we will be using some of our favorite brushes to do some scrubbing. For the wheels, we will be using the Speed Master Wheel Brush. For the tires, a Speed Master Tire Scrub Brush. And for the lug nut recesses, we will be using the Famous Brush. We will start with the wheels. We are going to spray a GENEROUS amount of our BLACKFIRE Tire & Wheel cleaner all over the surface of the tires and rims. We will let it sit for a bit so it will have plenty of time to bond with and remove as much of that brake dust as possible.
We will then start scrubbing the wheels thoroughly with our Speed Master Wheel brush. We want to make sure to get into every nook and cranny of our rims and provide ample amounts of scrubbing. The Speed Master Wheel Bush has a flexible stock that will even allow us to bend it to scrub the backs of the rims effectively!
Next up, we will use our Famous Brush to really get into the lug nut recesses and clean everything out of there quickly and easily before moving onto the tires
Using the Speed Master Tire Scrub Brush, we are going to agitate the surface of the tires. We aren't going to clean the actual treaded surface of the tires because those won't stay clean for very long anyway. Then give everything a good rinsing with the hose and you are good to go!
If your tires and wheels are particularly dirty, you may have to repeat this process. Washing the rest of the car: For the rest of the car, we are going to use a washing method that is probably a bit over the top compared to most washing routines. For our wash, we are going to use a combination of a Foam Gun wash (this is an attachment for a standard water hose. Similar to the Foam Cannon, but for hoses instead of pressure washers.) and the Two-Bucket System (a washing system that involves the use of one bucket for your car wash solution and another bucket for rinsing your mitt.) It is important to note that we are not doing this in direct sunlight or on a car that is particularly hot. If you cannot do so while you are washing, you should work in small sections and rinse often! Otherwise, the shampoo will dry on the surface and that is a pain. We are going to be using two different kinds of soap for this wash. The soap we will use in our Foam Gun is our BLACKFIRE Foam Soap and the soap we will use in our bucket is our BLACKFIRE Car Wash. The BLACKFIRE Foam Soap will foam up more easily in the foam gun, ensuring that we get an even coat. The BLACKFIRE Car Wash will provide more lubricity to our wash mitt to reduce the risk of washing-induced swirls. We will add 2 ounces of BLACKFIRE Foam Soap to our Foam Gun cannister and fill the cannister the rest of the way with water. We will set this to the side while we prep our buckets. We will be using 2 standard 5-gallon buckets for our wash, both of which have a Grit Guard in the bottom to ensure any dirt or grit does not find its way back onto the mitt while we dip our mitt in the bucket. Our buckets are two separate colors to ensure that we do not accidently mistake them during the wash. One of them is our Wash" bucket. In this bucket, we will add 2 ounces of BLACKFIRE Car Wash. Then, using a strong jet of water, we fill the bucket the rest of the way with water. The strong jet of water will make sure that the shampoo is properly diluted and will generate as much foam as possible. We will then chuck our wash mitt (which is a Supreme Micro-Chenille Wash Mitt) in the bucket and let it soak for a few. Our Rinse" bucket will simply be filled with water. Now we will attach our Foam Gun to our water hose and begin the washing process.
The first thing we are going to do is give our car a good heaping helping of foamy BLACKFIRE Foam Soap with our Foam Gun. This will make sure the surface is lathered properly and further lubricated for the washing process. Now we will get to work with the mitt itself! Again, just like with the pre-rinse, we want to start at the top and work our way down to avoid any contaminants from replanting on lower panels. As we go through the wash, we are FREQUENTLY rinsing our wash mitt off in the Rinse" bucket to remove any dirt and contaminants that it has picked up. We are then soaking it in our Wash" bucket to allow it to absorb more of the lubricating BLACKFIRE Car Wash solution. We are never going longer than the time it takes to wash a single panel without doing so.
As we work our way down, we will make sure to apply enough agitation to remove the most stubborn contamination from the surface. We will pay special attention to areas that have a higher concentration of contaminants like the hood, the grille, the windshield, the rocker panels, and the backs of the rear-view mirrors.
Once every surface of the car has been thoroughly washed and agitated with the mitt, we will rinse off the entirety of the car and make sure there are no more suds or car shampoo on the surface. Now we will inspect the car's various surfaces to make sure that all visible contaminants and debris are sufficiently removed. We will spot-clean any areas that are not up to snuff and rinse them off again until the entire car is as close to spotless as we can possibly get it!
Drying: Now we want to make sure to get every drip, drop, and dribble of water off this car quickly. If we do not dry the car completely, then the water will remain on the surface and evaporate. The problem with that is that even though the water evaporates, the minerals IN the water do not. The minerals that are left on the surface are not so affectionately referred to as water-spots". Nobody likes water-spots, so we will do all we can to avoid them! We are going to be using a combination of our Cobra Guzzler Towels and our BLACKFIRE Car Dryer to rid the car of water as soon as possible to avoid water-spots. If this was a maintenance wash and we still had a layer of hydrophobic protection on the car (like BLACKFIRE SiO2 Spray sealant), we would simply be able to use the BLACKFIRE Car Dryer and blast the water off easily. However, because this is a wash on a car that has never been detailed before, the water will not come off that easily, unfortunately. We will use one of our Guzzler towels (which are capable of absorbing up to 7 times their weight in water!) and skim dry the surface by dragging the towel over the surface of the car. Don't worry, it is a microfiber towel, so we won't have to worry about scratching the surface. This process will get rid of the majority of the water.
Next, we will take our second Guzzler towel and work on drying off any water that may have been left behind by the first towel's pass. Now we will use our BLACKFIRE Car Dryer to dry out all the miniscule nooks and crannies like the door jambs, the grille, and in between our bumpers. We may have to do another pass with a Guzzler around these areas afterwards in case any water was splattered out onto the rest of the car. Step 4: The Admiration Now all we have to do is sit back and look at the results of our thorough and carefully executed car wash!
Now this car is stripped clean and ready for everything else we have in store for it! Join us on our next installment in this informational series where we will go over Paint Decontamination! In this section, we will be going over how to remove all the embedded contamination in your glass and paint using an iron remover and a detailing clay mitt!