
How To Detail Your Cars Polished Metal and Trim
CLEANING BLACK TRIM
Most cars made during the 1980s and 1990s featured some black trim. Most black trim pieces are made of plastic, rubber, anodized aluminum or satin black painted metal.
All black trim should be regularly cleaned with car wash shampoo. If extra scrubbing power is required, use a toothbrush, paintbrush or a soft detailing brush. Do not use a stiff bristle brush on black trim, as it will scratch.
To keep black trim in good condition, it must be treated with a protectant 6-8 times a year. There are different treatments for different materials.
On smooth black plastic, you can use any vinyl and rubber dressing. For best long-term results, choose a vinyl and rubber dressing that contains ultraviolet (UV) protection to prevent sun fading, such as Sonus Total Eclipse. On textured black plastic, use a vinyl and rubber dressing. A gel product, like Sonus Tire & Bumper Dressing Gel offers longer protection and a rich, glossy look.
If your textured black plastic is heavily weathered or faded, you can bring it back to life with a product like Forever Black, which is a dye system for black plastic and rubber trim. It's advertised as a permanent solution, but in my experience it will only last a couple of years if the vehicle remains in the sun. Also, don't think that Forever Black is a replacement for vinyl and rubber dressing. It's not. After Forever Black cures, you still need to keep the trim protected and looking good with vinyl and rubber dressing.
To maintain black anodized trim, use a non-cleaning wax or sealant. Anodized aluminum must be treated with great care. The coating is very thin. Even the mildest abrasives (polish and cleaners) will quickly scuff or remove the coating. The sun is a problem, too, as exposure to UV rays will fade black anodized trim.
Painted black trim is often difficult to properly maintain. If you wax it, the original satin finish will begin to take on gloss. If you don't treat it, the trim will fade and become flat. The best solution I've found so far is to treat satin black trim (windshield wipers are a good example) with Ultima Tire & Trim Guard Plus. This product is amazing on these trim areas, offers a natural satin finish, dries to a greaseless finish, and won't soften the black paint. Simply wipe it on and let it dry. It lasts for months!
MAINTAINING RUBBER SEALS AND MOLDINGS
Rubber seals and moldings around windows, doors, lights, hood, trunk and bumpers are designed to protect the car from water, wind and dirt. These rubber components also trim the car to enhance its appearance. If you do not maintain rubber seals, they will become stiff and brittle, and will eventually crack or tear.
Clean rubber door, trunk and hood seals with soap and water twice a year. Treat the seals with a water-based vinyl and rubber dressing. After coating the seals, allow the dressing to penetrate for 10 to 15 minutes, then dry the seals with a clean towel. I use Sonus Total Eclipse on seals. It dries completely oil-free and protects against cracking.
Some car manufacturers, such as Porsche and BMW, recommend using talcum powder on door and hood seals to provide lubrication. This will extend the life of the door seal. Simply sprinkle a small amount of talcum powder on a small piece of T-shirt material and wipe it onto the seal after applying rubber and vinyl dressing.
Rubber seals around windows, lights, door handles and mirrors should also be cleaned twice a year using a brush and soapy water. However, these "exposed" rubber seals should be treated more frequently than door and hood seals, as they get heavy UV radiation from the sun.
I recommend treating window seals with rubber and vinyl protectant once a month. Apply the protectant prior to cleaning your windows. Use a generous amount, and allow it to penetrate before buffing dry. When working in tight areas, use a cotton or foam swab to apply the dressing. Use a quick detailing spray to clean off excess protectant from painted surfaces.
DETAILING CAR BADGES
Many cars have badges or emblems sporting the manufacturer's crest or the name of the automobile. These badges are easily cleaned with a soft toothbrush or detailing brush and soapy water.
If the dirt is stubborn, use a higher-strength cleaner, such as 303 Aerospace Cleaner. Be sure to flush thoroughly with water after using one of these cleaners.
After cleaning, protect the badge with a coat of wax or sealant. Remove any excess wax with a quick detailing spray and a clean toothbrush or detailing brush. If you have old wax buildup or stains you need to remove, try a wax removing product.
Car name emblems are often more difficult to clean and wax around than a badge. Most often, the emblem is a script that sits right on the paint. Waxing around these emblems is a challenge, as a polishing cloth won't reach between the letters to remove wax residue. In this case, use cotton swabs, or wrap the head of a tooth brush with a single layer of cotton T-shirt material.
PROTECTING DOOR AND BUMPER GUARDS
Many cars include door and bumper molding that serves to protect the car from door dings and soft bumps. Treat these pieces of trim with rubber and vinyl protectant once a month to keep them in good shape. I like Sonus Tire & Bumper Dressing Gel for this job. It works great under the hood, too.
Door and bumper molding should be thoroughly cleaned twice a year with soapy water and a toothbrush or detailing brush. Dirt commonly builds up on the bottom edges, in cracks or around the small caps used to terminate the ends of molding pieces. Use the brush and soapy water to get in the cracks as deeply as possible.
POLISHING LIGHT COVERS
Plastic light covers scratch easily. After only a few months on the road, light covers will begin to show signs of wear. To keep light covers looking good, they must be regularly cleaned and polished.
You can clean and polish light covers with the part on the car, but I find it useful to remove the light covers at least twice a year. Doing so allows me to inspect the seal for wear, check for corrosion, and clean the painted area around the light. It also allows me to clean and polish the light cover much better than I could if the part was on the car. Most can be removed with a Phillips screwdriver.
For thorough cleaning and light polishing of all clear plastics, I recommend Plexus.
CLEANING LICENSE PLATE FRAMES
License plates and their frames should be removed from the car at least once a year for cleaning, polishing and treating. You'd be amazed at the dirt that collects behind your license plate and behind its frame, too. A good time to do this cleaning is when you renew your tags.
With the license plate removed, you can take it to a deep sink and give it a good scrub. After cleaning, give the plate a quick buff with a paint cleaner or fine polish, and then protect the plate with your wax or sealant. Clean and protect the frame, too.
POLISHING METAL
Most car fanatics love bright, shiny, polished metal. There's nothing quite like perfect chrome, polished aluminum wheels or bright exhaust tips to improve the good looks of a car. Engine compartments with polished manifolds and other bright work really make a difference, too.
While polished metal is great to look at, it's not always easy to achieve, especially if it has been neglected. This section gives some quick tips on metal polishing. With the right tools and a little work, you can achieve great results.
POLISHING CROME
Chrome is by far the most common bright work on an automobile. Chromium, the metal used to chrome-plate steel and other metals, resists tarnishing and holds a shine better than all other metals, including platinum. Chrome has a single enemy: rust. Over time, chrome oxidizes and develops rust spots. The higher quality the chrome plating, the more it will resist rusting, but eventually, it will happen. If you allow chrome to go too long without removing rust, it will become permanently pitted.
Heavy rust on chromed parts requires a decision: polish or rechrome. Replating small parts is pretty easy. Simply remove the part and hand it to your local plating company. A few days later you'll have your part back looking like new. However, what if it's a large part, like a bumper or a window frame? Replating a medium or large part is expensive. Even modest-sized parts, such as hubcaps, can cost $100 or more. If you think there's even a remote chance the rusted chrome part is salvageable, you should try to save it.
Removing rust and polishing chrome can usually restore chrome to a reasonable-looking condition. If the rust simply coats and is not deeply embedded, the chrome should come back to life. As long as the chrome is not flaking off, you have a chance of saving it.
Most pro detailers use fine grades of steel wool to remove rust from chrome. It's quick and easy. Please use caution if you choose this route, as even fine (#000) or superfine (#0000) steel wool leaves minor scratches that you will need to polish with a metal or chrome polish to remove. Another product that works well is the household steel wool soap pad. The soap acts as both a cleaner and a lubricant to prevent scratching (use plenty of water). Warning: Keep steel wool away from painted surfaces.
If you have rust in cracks and crevices you can't reach, use a toothbrush and household cleanser. Wet the toothbrush, dip it in the cleanser, and start scrubbing. The abrasives in the cleanser remove rust very fast. Rinse well with plenty of fresh water.
The final step for chrome is to polish it with a good chrome or metal polish. Use a polish specifically made for chrome. With most metal polishes, a little goes a long way, so use just a little dab at a time. Also, the best metal-polishing cloth is soft cotton, such as T-shirt material. Cotton fleece, such as from an old sweatshirt, works great, too.
POLISHING ALUMINUM
Aluminum is an easy metal to polish. It's soft enough that even the roughest aluminum parts can be quickly polished to a bright shine. A few years ago, in a fit of craziness, I decided to polish all of the aluminum parts on the top side of my 1989 Silver Anniversary 911's engine. I went nuts. Everything was subject to being polished, including the intake manifold and the distributor. It was beautiful!
Polished aluminum has a fault: it tarnishes quickly. Most factory-polished aluminum parts are sprayed with a clear lacquer, acrylic or urethane to seal the part. This is very common on polished wheels.
If you're trying to restore a polished aluminum part that has been anodized or clear coated, you must first remove the coating. Many professional polishing shops use an aircraft-strength stripper for this job. You must use these chemicals with extreme caution, and never let them come near your car.
You can polish aluminum by machine or by hand. With the invention of the polishing ball, there's no reason to polish by hand. With a polishing ball and a cordless drill you can polish your wheels to a brilliant finish in a matter of minutes.
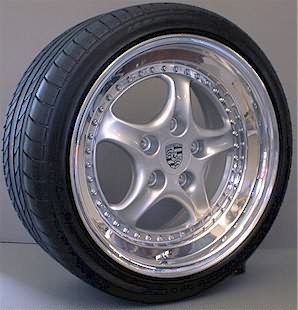
These polished aluminum Kinesis wheels require polishing every six months to keep their shine. To hold the shine for that period of time, I use Ultima Tire & Trim Guard Plus to seal both the tires and the wheels.
POLISHING WHEELS - BEFORE AND AFTER
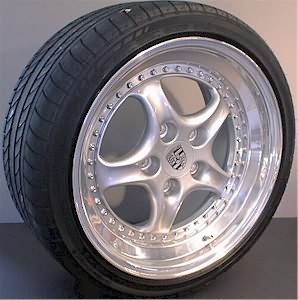 | Before PolishingPrior to polishing, my wheels were tarnished and dull. The difficulty with these wheels is polishing between all of the bolts. |
| | After PolishingAfter polishing, the wheels are very bright, almost like chrome. |
POLISHING STAINLESS STEEL
Stainless steel is a wonderful metal. Although it does not polish as brightly as chrome or aluminum, it will take on a good shine. The only problem is that stainless steel is very hard.
A common use for stainless steel is the exhaust system, including the exhaust tip. Many people choose to cover unpolished stainless steel exhaust tips with chrome sleeves, often for as much as $400. With the advent of the polishing ball, you can polish that exhaust tip to a bright shine in just a few minutes.
This stainless steel exhaust tip on the bottom was polished using a polishing ball and cordless drill. It took less than 10 minutes to achieve excellent results.
STAINLESS STEEL POLISHING - BEFORE AND AFTER
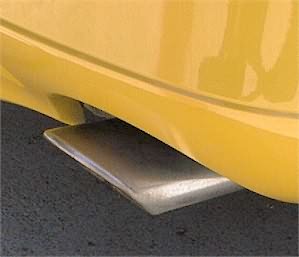 | Before PolishingStainless steel is one of the more difficult metals to polish. It is very hard, so if the metal has imperfections, it would take a lot of work by hand to create a nice finish. However, using a polishing ball and cordless drill, it took less than 30 minutes to achieve excellent results seen below. |
 | After PolishingI was lucky. Although rough, the tailpipes did not have any deep pits or imperfections. They polished to a bright shine very quickly. |
SUMMARY
It's the small details that make the difference between a good-looking car and one that's stunning. In a recent visit to the San Diego Automobile Museum, I couldn't help but notice how the beautifully restored, polished and treated trim on some of the vintage and exotic cars made for a stunning display. Pay attention to your trim and see what a big difference it makes in your car's final appearance.
There are no products listed under this category.